Farmhouse Railing Upgrade - by Sara and Chris

Amazing stair railing upgrade shared by Sara and Chris!


Built from Plan(s)
Amazing stair railing upgrade shared by Sara and Chris!

"Thank you Ana White for your plans I'm in love!"
Tarryn Leigh Curlee


I needed sturdy stairs for my 2 60lb dogs. My bed is 33 inches from floor to top of mattress. So, this is my very first project completed by myself! Custom size pet stairs 24inx24inx24


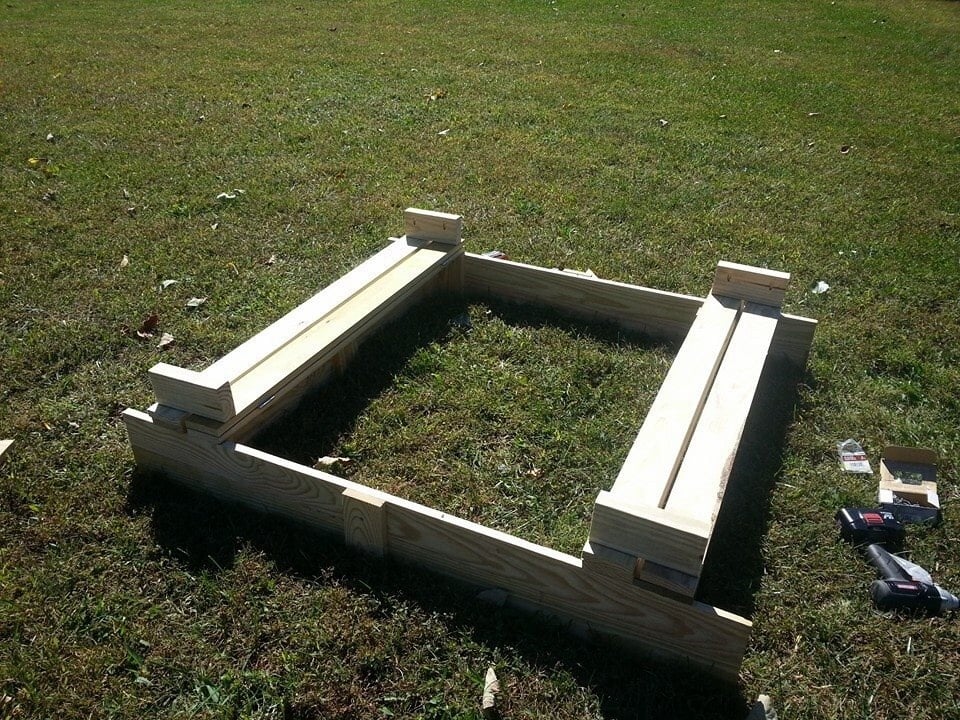
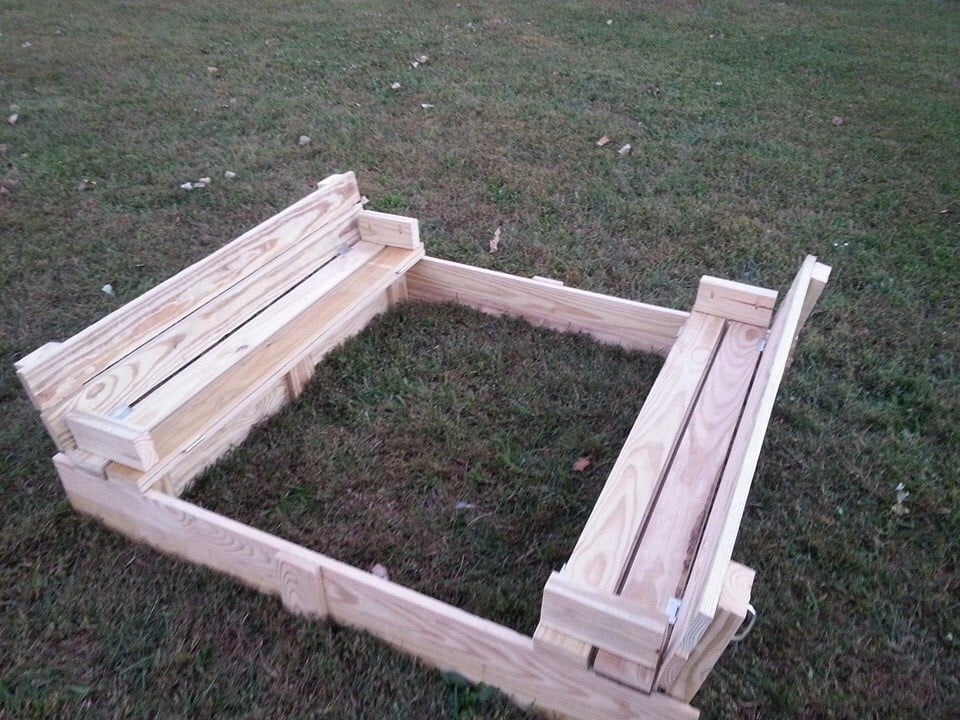
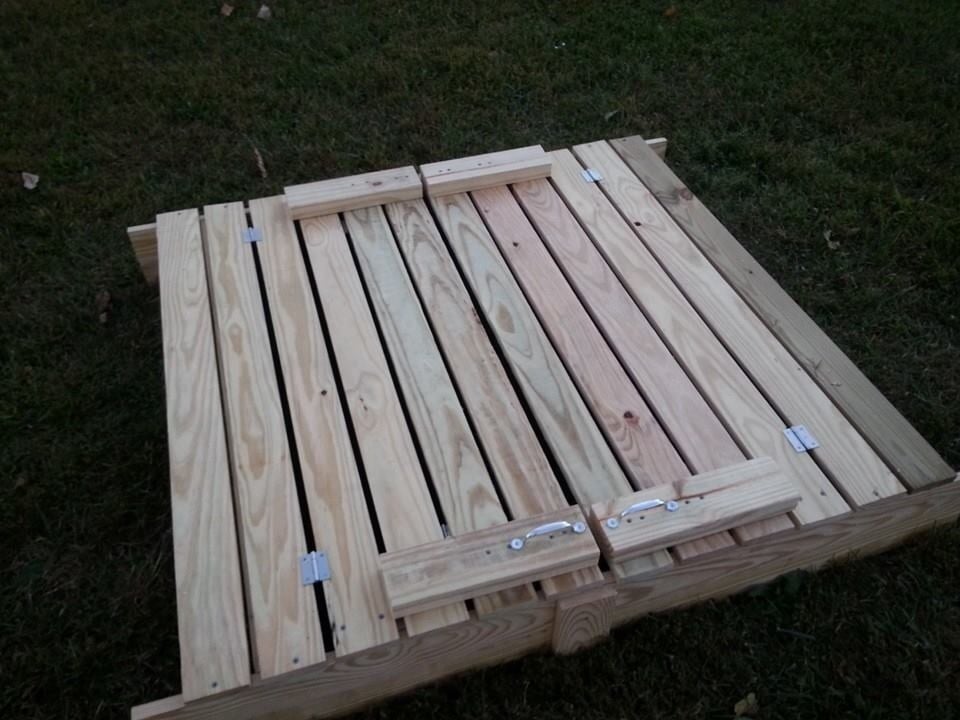
Modified the design a bit to be lift up lids instead of tilt out.

Fri, 02/16/2018 - 17:18
Can you post the specific plans for the lift up trash and recycle bin??
Sun, 05/26/2019 - 18:28
If you could post the plans for this, It would be nice. Great job!
Fri, 01/10/2020 - 05:16
I just love this and would love to have the specific plans for this project!!!

Fri, 01/17/2020 - 20:23
Thank you for the great idea. I’m going to add a third bin and use it for laundry in my bedroom.
Sat, 03/07/2020 - 02:29
I’d be grateful for details, plans, measurements for this project. This is an amazing build, nicely done.With green top looks fantastic and complements the white very well.
Thu, 01/11/2024 - 20:31
To everyone asking for the plans, it's a modified tilt out. It states right there under the pics that it was modified and the original plans are there in red, under "Built from plans"

This project was so much easier than I thought it would be when we started. If you follow ana's plans your bunkbed will be much stronger than anything you can buy for a fraction of the price. I would never do it but I honestly think I could park my truck on these beds. The finish is red mahogany stain with a couple coats of polyurethane over it. They say not to use dark stain over pine because of the uneven coat but i like the way it striped the grain. Not everyone's cup of tea but we love it.
We've all heard the saying "give a man a fish and you feed him for a day, teach a man to fish and you feed him for life. Thank You Ana for teaching me to fish. This was the first, but will not be the last project i do from your site.


Mon, 10/27/2014 - 12:43
What materials did you use for your matress supports (size, spacing, attaching)?

I made this in an afternoon. Loved this project. It is made with 2x4's using a Kregs Jig and mitre saw (plus additional tools like a drill and square). This was my frist time using the Kregs Jig and I am sold!!
The free plans were taken from another website. They are very detailed and there is even a video (I recommend it as he gives a great tip for making sure the back stays equal/level to each other before putting the back on). Even though you can build this by yourself, I did have help for the heavier sides once they were assembled. I plan to build the additional side table soon and finish them both with sanding and staining when the weather seems less iffy for rain.
If you are looking for a good beginner project that doesn't take forever or have complicated steps, this is your project.


Our old screen door wasn't cutting it anymore, so I built a new one, and to kill two birds with one stone, I included a built-in dog door. Now I just need to find the motivation to close off the old dog door.
I have the plans to build this screen door with a built-in dog door posted via the blog link below for anyone interested.

I completed this table with my 5 year old daughter as my assistant. My husband requested a table to put next to our new hot tub to set his drinks on and this is perfect. We only put one board on the top because I felt since it would be outside, I wanted a smooth top. I just screwed it in diagonally from the bottom. I also used spar varnish since it would be outside.


We needed a way to get all of the lawn & garden stuff out of our garage and organized. I found Ana's plans for the Small Cedar Shed & adjusted them to fit our space. We used 2x4s as our studs & added front walls on the sides. Our shed measures 9.5'x30". We had a concrete slab poured for our foundation. We are experienced DIYer's but had never taken on a project of this scale from scratch. This project was much easier than I was anticipating, and we were able to complete it in one weekend! Similar shed kits were way more expensive and not the size that we were looking for. Thank you so much for the inspiration!


We loved this greenhouse plan from AnaWhite and wanted to be able to grow in 3 seasons so we modified the design to include humidity & temperature control & 18" deep elevated cedar beds inside with 4x4 posts for support and trellis option. We added electricity in order to have a lighted workspace and the ability to put in a circulating fan to control mold and fungus. We added 2 work tables (2x2') on the inside of the door left and right side door in order to do seed trays & store supplies. This was a wonderful project for my husband and my plants inside are doing incredibly well compared to my outside garden beds here in zone 5. Products used:
Foundation
We had a landscape company come and scape/dig a platform and then fill/compact with crushed rock
My husband then used rebar driven into a 4x4 frame in order to secure the frame to the ground and create a base upon which to build the greenhouse
Active ventilation
AC Infinity Cloudline T8 Inline duct fan
Air king range hood wall cap 8" on the bottom outside of the greenhouse wall for air intake + flex 8" duct to the fan itself
Shelter logic autovent automatic shelter vent kits (1 on each side of the front wall) in order to allow air intake from the bottom back of the greenhouse under the elevated beds to flow to the front of the greenhouse and out
Circulating fan- Hurricane wall mount fan 16" - this fan has 3 speeds with tilt function and small mounting bracket
Soil - sourced 3 yards of 50/50 loam/compost from local landscaping supply
60% loam
30% organic compost
10% organic topsoil + perlite
Soil beds
-cedar frame 2 feet wide along sides, 3 feet wide on the back wall
-galvanized metal roofing with holes drilled into it for drainage
-landscape cloth lined


Wed, 09/09/2020 - 13:09
Thanks for that update! I was wondering how to vent this project, as Green houses need the ventilation. Good to know dollar amount also. Great photos.
Wed, 09/09/2020 - 13:09
Thanks for that update! I was wondering how to vent this project, as Green houses need the ventilation. Good to know dollar amount also. Great photos.
Wed, 09/09/2020 - 13:09
Thanks for that update! I was wondering how to vent this project, as Green houses need the ventilation. Good to know dollar amount also. Great photos.

I built this table for a friend who wanted a rustic, plank-top kitchen table. She wanted a square table with 4x4 legs. Since I don't have clamps, I used pocket holes and wood glue for the table top. Also, I only have a 7&1/4" miter saw, which means the 4x4s were too thick to cut. So I made one cut in the legs, then flipped them and made another. It worked! :) I sanded down the sides of the table top with 80 grit. They needed to be evened up since some of the planks were a little longer than others. I back braced underneathe the top with (3) 1x3s. Then, I sanded all over with 120, vacuumed, then wiped it down with a damp towel. Fun build!!


I didn't build this shoe dresser because I particularly needed one, but it looked so lovely that I couldn't resist.
- I modified the plans by building 3 bins instead of 2 so it could hold more shoes.
- I decided against the dowel stick and opted for hinges instead, which were surprisingly not too difficult to assemble. I found that I didn't even need the magnets after installing the hinges as the doors stay closed.
- I used 7" chains on both sides of each bin instead of a belt to make it extra sturdy.
- I added two back legs.
Et voila! This is the end result. I'm very pleased.
PS. Those flopping bins are a pain when you're trying to build!! An extra pair of hands is definitely recommended.


Fri, 07/05/2013 - 22:49
Pretty :) Good Job. Now if I only had the space for one thats 10 rows high :P I like the stain color too. Shanty 2 Chic always uses Rust-o-leum. I think its called dark walnut. Dont quote me though. I love the stain and spray paint combo colors they use.
~Melody
In reply to Nice Job by SoCaliforniaMel
Sat, 07/06/2013 - 20:00
Rust-o-leum, that's the one!
Yes, if only every woman could own a 10-row cabinet for all her shoes! :)

Used sturdy workbench plans with 2x6 cedar top for outdoor sink. Turned out much better than I expected!!
Tue, 05/02/2023 - 07:09
Way to go, it is beautiful and functional! Thanks for sharing.

I modified this plan so I could have 4 total work areas. Total Size: 48" x 96"

Tue, 09/08/2020 - 19:42
Is there anyway you can share these plans with me!? I drew out some plans for an identical table but I think my cuts may be off! It would be so helpful.
Fri, 11/06/2020 - 12:47
Is there a full update post with instructions for the table shown?
Tue, 12/20/2022 - 22:03
LOVE this! Just what I'm looking for! Can you tell me what you used for the top?

I changed plan to make deeper. I also modified the bottom trim and top. I put a ball bearing soft door drawer guide on modern door so it can slide back and forth. I feel we need more modern plans on here but with a bit of creativity and using plans you can make anything. I have never built anything before. I love General Finishes Milk Paint in Snow White and I brushed rolled it on (sanded between 3 coats). It’s basically self leveling and leaves a nice matte finish. Used door glide in picture bought from homedepot in the 24 inch and that’s how wide door was and it was 36” tall. Door glide I only used one on top of the door not on bottom as well. Door piece of fiberboard with just strips glued on and quarters spacing them correct.


I was inspired by DIY Pete's Double bench seat but wanted more of the traditional adirondack look, so I kind of combined 3 plans together to get this! For my first attempt at these chairs with a few of my own tweaks I think it turned out pretty darn well. Changing the legs to extend out the back and curve out the front posed small challenge and then mounting the chair backs at a comfortable angle. There are some imperfections that probably only I would notice but I can correct it for next time. This photo was taken just after staining when I noticed that I missed sanding some wood filler on the front of the seat. Building these chairs only took about 6.5 hours before the finishing process but the next time would go faster. I am currently in the process of adding a protective varnish to give it a semi-gloss finish. All together it cost me under $100 CDN or $80 USD.

I modified this a tad from the original plans to suit my needs. I will eventually be adding a platform with attached slide and swing set.
Plans were easy to follow. My store didn't have 1x8's so I stacked 1x4's and used my Kreg jig to join them together and then I added extra bracing.
I had seen this on Pinterest a couple years ago and thought it was the coolest thing! Io excited I was able to build it myself!


Fabulous home gym by Nailgun Nelly!
*Incorporated and modified the grand waterfall console plan

We wanted a shorter version, so that it would hide behind this fence. I just needed somewhere to store lawnmower, wheelbarrow, and a few yard supplies. I started putting the roof on hinges, but the gas struts couldn't support the 170 pound roof. So it's fixed in place (stronger structure anyway). That's why I went with 2x4's for the framed walls instead of 2x2's.


Thu, 06/11/2020 - 17:15
Very Nice modification. Two thumbs up! May I please ask you for the dimensions of the shed?

Started off with the original design but enlarged it to fit an oversize single mattress. The mattress cost me $35 from a local faith farm, while the materials came in around $200. I decided to hang under my backyard pergola. Fun and easy project.


Tue, 01/28/2014 - 21:10
Wow this looks so inviting I might just have to make one too! Nice work-- it looks great!
Mon, 04/07/2014 - 22:49
Really lovely! Great job! This will be one of your favorites spots all summer long.
Mon, 07/27/2015 - 22:45
I want this! I just made a couple of plant stands for my front porch. My husband asked me what my next project was, why, a swing bed. (This was only my second project!) I want to put cup holders in those big ole arms! We have a house at the beach in South Alabama, so, you gotta "hydrate." This is an awesome swing. I can't wait to do mine...pillows to rest on, one foot on the concrete pushing me in a slow swing. Cold beverage in my hand or in my cup holder. Yep, southern girl has a new project. Love it!

I modified the plans for the Classic Bunk beds by making them 74" tall instead of 63" and added a fourth slat all the way around to add more protection from potential falls. I created one opening in the front for my youngest to get into the bottom bunk, and built slats about 2/3's across the front to act as a gaurd rail. I created another opening on the side for my oldest to get into the top bunk with stairs instead of ladders to again prevent falls. I had to modify the Sweet Pea stairs to accomodate for the extra height in the bunk beds, simplified the railings, and I created each cubby to be big enough to use cloth storage totes that were 11x11x11. Sanded the whole bed and stairs so the corners and edges were all rounded and smooth, and put two coats of white Deck and Porch paint to stand up to the the boys running up and down. I used brackets to secure the stairs to the bed, and sixteen 3" bolts to bind the bed together. Precut and drilled 17 slats for each bed seperated them 2" apart. Spent a few hours every night during the week measuring, cutting, glueing, drilling and assembling the bed and stairs. Spent an entire weekend sanding and painting. Very happy with the way these beds turned out. Overall cost of the project including the paint was around $400.


