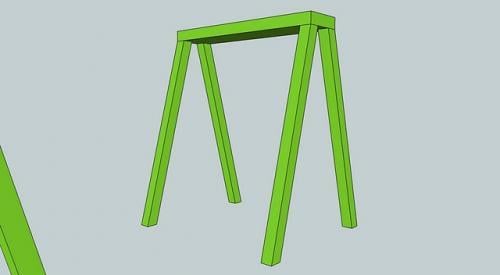
Swing and arbor

Weekend swing project
Built from Plan(s)
Recommended Skill Level
Beginner
Weekend swing project

I needed a heavy duty dog bed for my puppy after he destroyed two regular dog beds. I used 4x4s, 2x4s and fire hose. He has not been able to destroy this one and he loves it.
Mon, 07/08/2013 - 15:48
I have a pit bull. Shes the sweetest thing but loves to chew up her own beds. She wont chew the shihtzus bed or the cats beds just her own. I'd like to see her try this one out.
;) Now if I could figure out a way to get my dad to give up one of his fire hoses. hehe
Great job, great idea
~Melody

We started this project last fall with the goal of creating a multi use hobby greenhouse with plenty of space for the kids to get their hands dirty. We purchased the Small Gable Roof Greenhouse plans and made our first (of many) trips to the hardware store. Since becoming homeowners in 2015, we've done countless projects but nothing as big as this. We are still very much learning the nuances of greenhouse growing in Colorado, but that has become a fun experience for our entire family. Since completing the structure, I've found that I'm more interested in making the space more functional than I am in actually gardening. I added a shelf built almost entirely from old pallets, a raised cedar bed and solar powered exhaust fan/lights. Luckily, my wife loves spending time in there tending to the plants! As the summer heat sets in, we will face new challenges of how to keep the space cool. Maybe by adding a shade cloth and misters? Regardless of what the "output" looks like we are loving this new hobby and are looking forward to learning new skills!

This project started as an idea to build a single Farmhouse Media Cabinet with a "42 tv mounted above it. I quickly realized that this space deserved so much more. Fast forward through weeks of debate and scouring the internet for inspiration, before finally settling on what you see pictured above. The first decision we made was to buy a monstrous 75", then everything else fell in to place from there. The tight stairwell leading to the basement forced me to build this unit in 6 sections (2 farmhouse media cabinets, 2 flanking cabinets, and 2 bookshelves.) It ended up sprawling 17' long when it was all said and done, but it fills the space so beautifully. It was by far the largest project I've ever tackled, but it was totally worth the hard work. Big shout out to Ana White for the inspiration!!


This was my first real woodworking project and was so much fun! I use my deck much more now and am excited to build more!


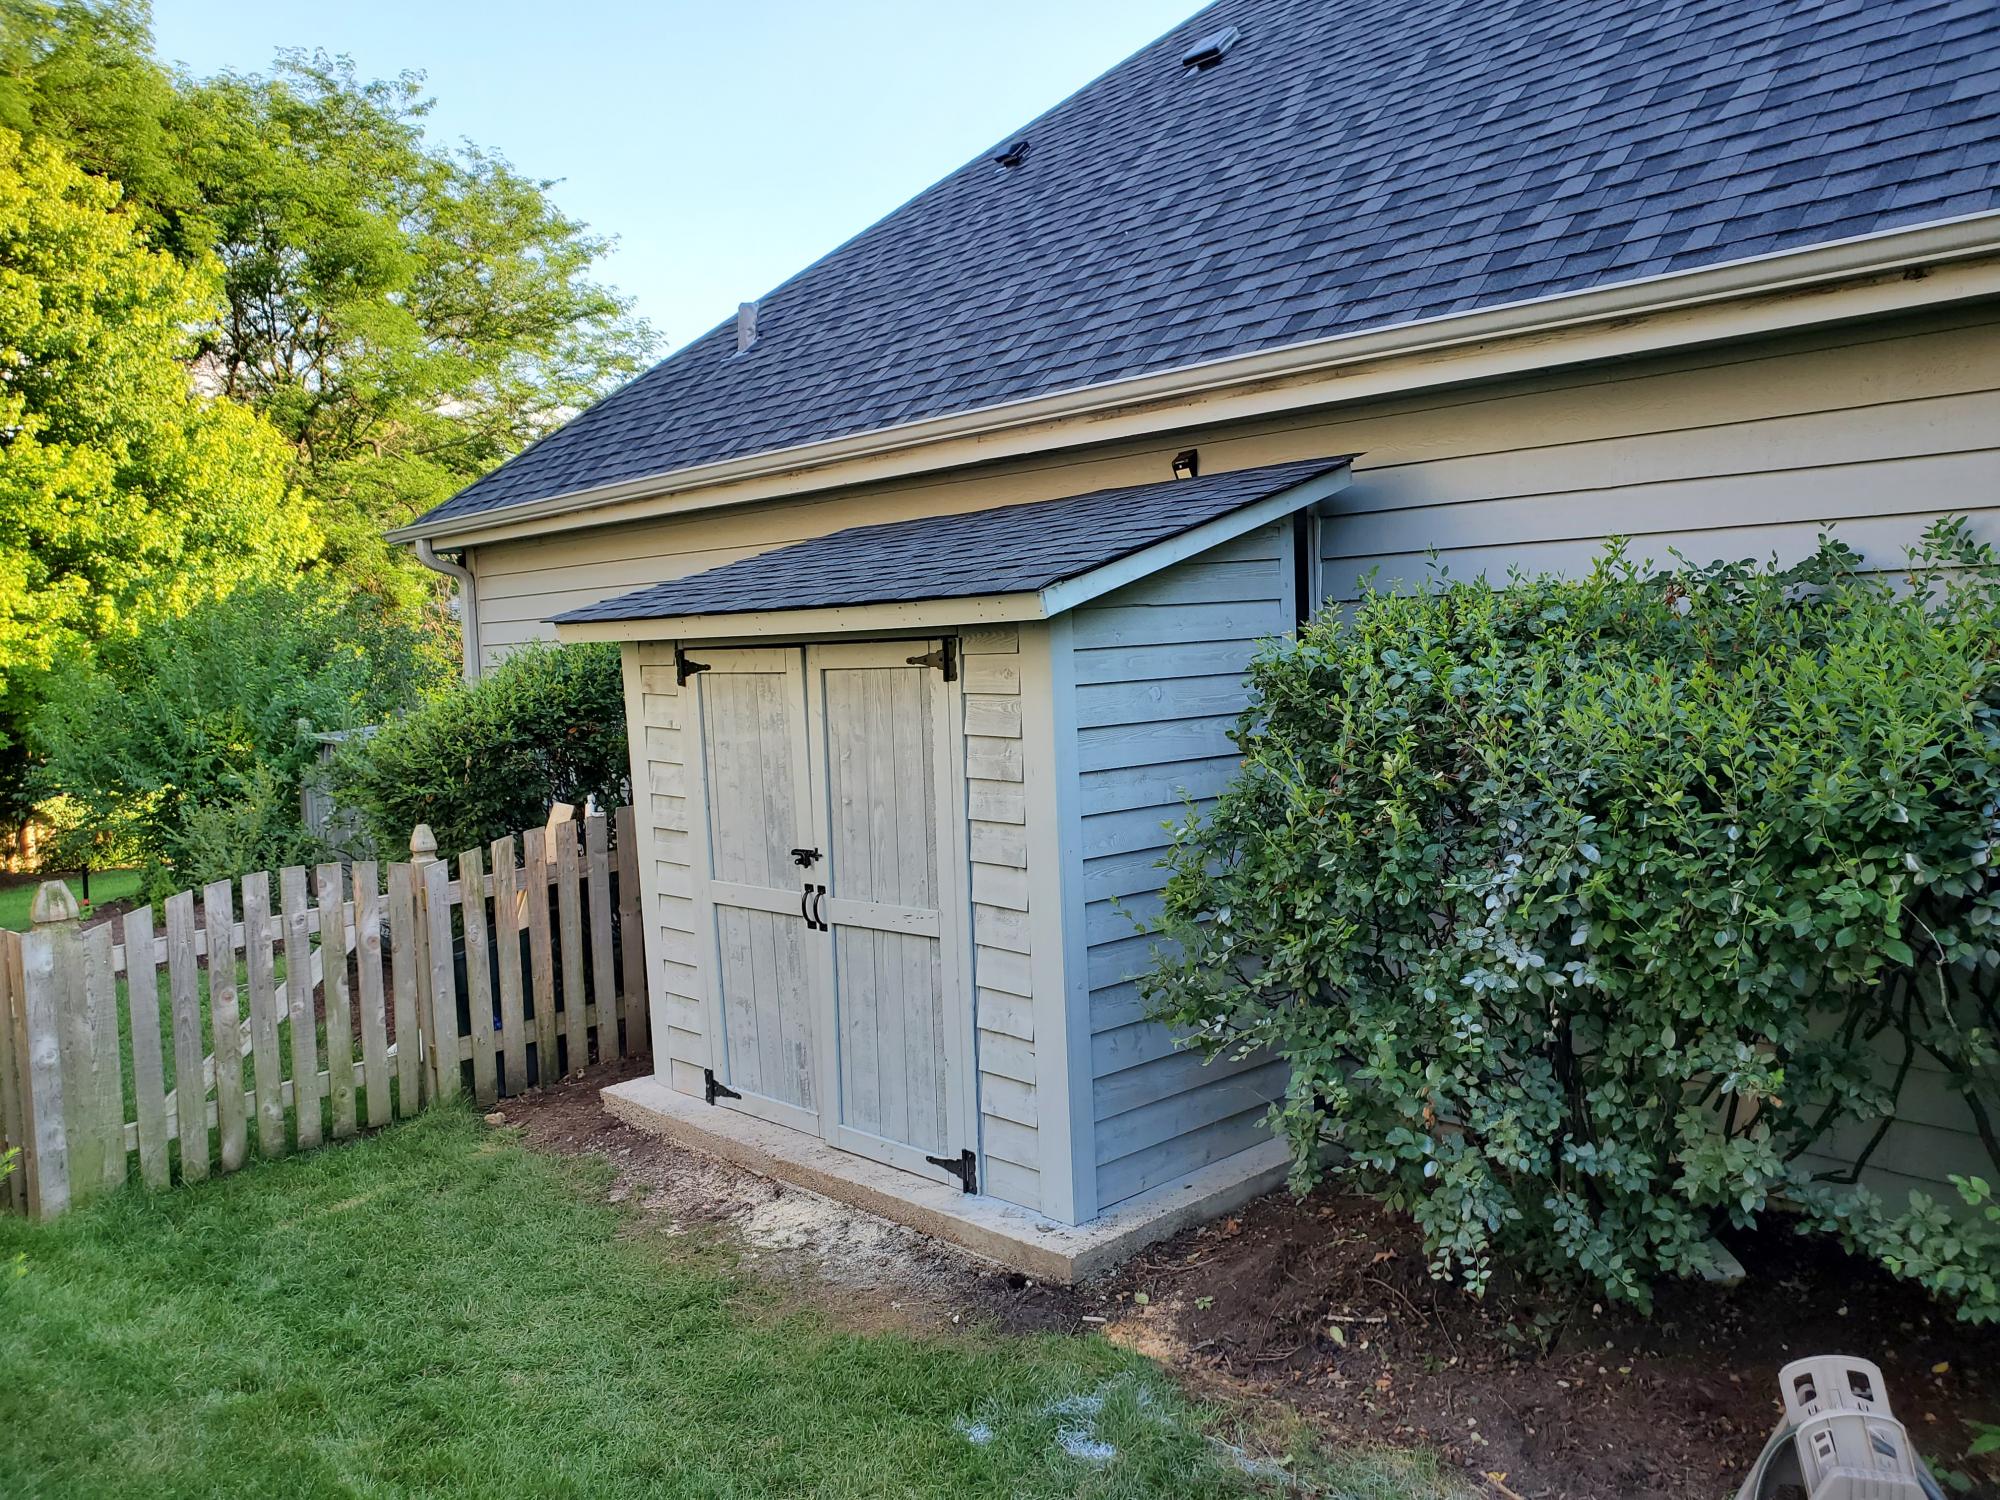
Thank you for the plans, shed turned out great! My association required me to match the siding color, roof color, and anchor to a concrete slab. So I poured 25 bags of 80lbs concrete to make a 9x5 slab. Redid the plans for an 8x4 shed, built the frame with 2x4s and not 2x2's, installed flashing, ice/water shield + felt + matching shingles since I'm near Chicago, and used a flexio finishing sprayer to paint the shed. Saved some $ by using 2 Redwood Grain Fiber siding panels for $22 each at HD.
All in all very happy with my shed and all my dangerous yard tools and woodworking tools can be put away from my toddler.


Built the porch swing and was inspired to build the glider frame by another "Brag Post" Looks great and fits perfectly in my back yard!
Fri, 02/18/2022 - 08:20
Are there any dimensions for the glider part? I have first year agriculture students building this, but we are unsure of the cut list for this. I am sure I can figure it out as the teacher, but with 20 students in the class, it would be better to be able to give them instructions to follow on paper. Thank you!!!
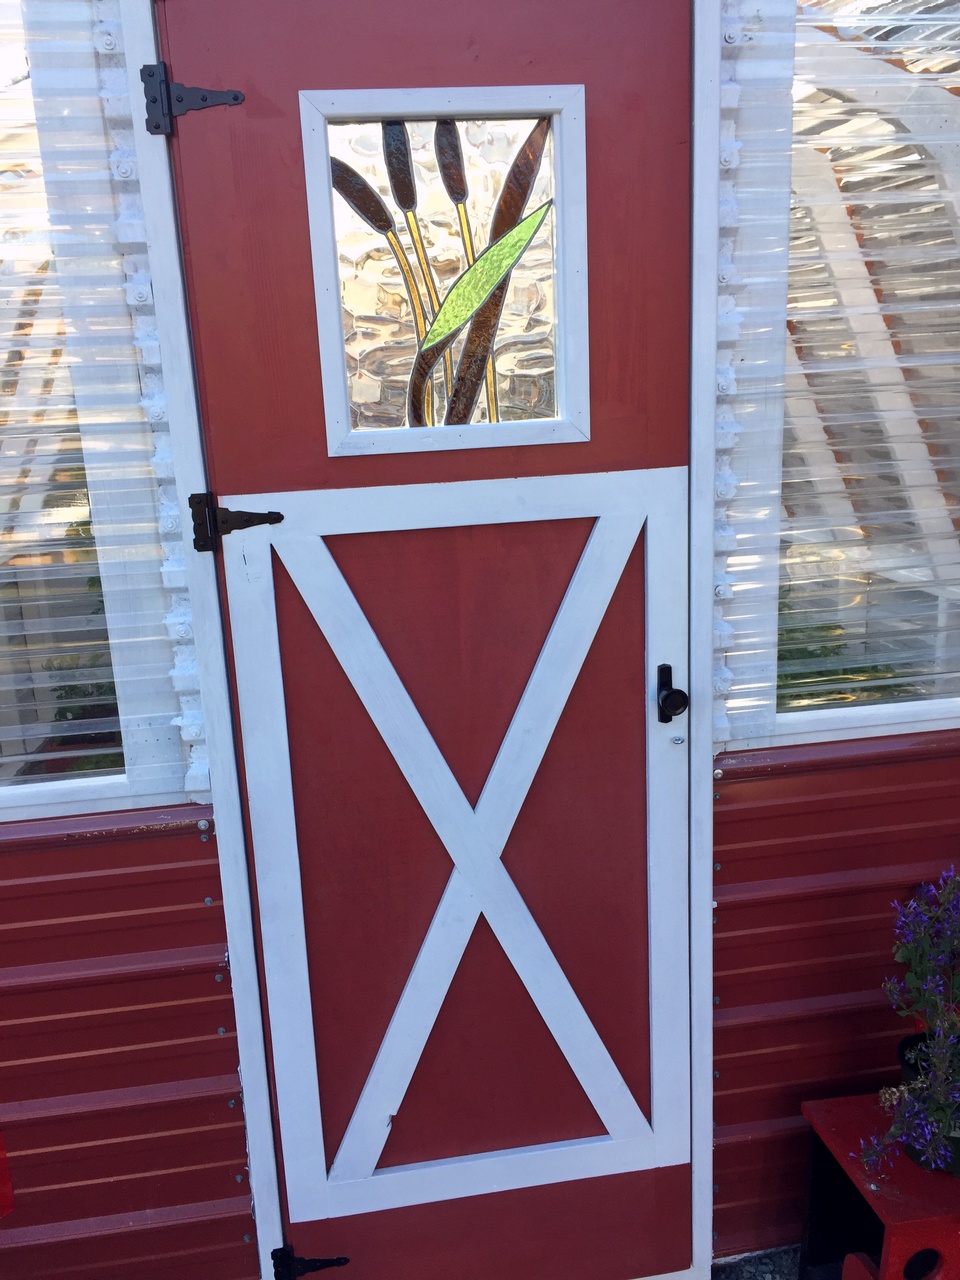
I knew I wanted an unusual window in our new greenhouse door. It took a lot of looking, but finally found what I was looking for!

Been a while since I had time to actually build anything worth posting about! My wife wanted some items for her Kindergarten classroom this year, so built several items, most inspired by the Farmhouse family.


Sat, 06/29/2019 - 05:47
I love this! Can you give me the plans and list of materials for constructing it?
Sun, 06/30/2019 - 12:33
I am also a teacher and would love to build this desk for my reading class. Do you have plans?
Mon, 07/01/2019 - 18:05
I love this table for my classroom. Can you share the plans or the dimensions?
-Stephanie
Sun, 07/07/2019 - 09:46
I would love plans/dimensions for this! I was thinking I could also paint the top with wipe off board paint.
Sun, 07/07/2019 - 14:59
I would love to make one for my classroom. Can you share the plans and materials list for this table?? Thanks!!
Mon, 07/08/2019 - 19:11
I am looking to make this for my fourth grade classroom - can you provide the dimensions you used? Thank you so much.
Wed, 07/10/2019 - 11:59
Love this!
I would love this for my classroom! Can you share the plans and materials.
Thank You!
Mon, 07/22/2019 - 18:25
Anyone have any luck with figuring out the dimensions??
Thu, 07/25/2019 - 17:20
Has anyone gotten the plans for this table? I have contacted Ana White and tried other ways also. I would love for someone to share.
Thank you
Teri
Mon, 08/19/2019 - 12:09
I am guessing the corner posts are 2 x 4s, the top is 2 x 10s. It looks like the width is 6’ (looking at the floor carpet tiles being 24” square). So 2 - 2 x 10s side by side for the main part of the desk top and 2 - 2 x10s perpendicular on each side of the chair. I guess the height is subject to choice and the length of each side would also be subject to choice or to the length of the 2 x 10s to be economical.
an educated guess would be 4 - 8’ 2x10s for the top and 6 - 6’ 2 x 4s for the legs?
Anyone else have any input here? Open to suggestions.....

I modified the plans for the planter box to make a holder for Pool Noodles. I made it 40" tall and used 4-4" fence pickets and 1-5.5" fence pickets. I used a 4" spacer and the openings worked out perfect. I stained inside and out since it would show with 2 coats of the solid stain. It is perfect! Thank you so much for the inspiration and plans!

Mon, 06/06/2022 - 14:04
This is so smart and looks great too, thank you for sharing!

This was so much fun to do! Very easy and I added some personal touches. I made the lower level an enclosed sandbox area with a chalk board on the back wall. On the outside of the back wall, I added a "ball wall" that my kids love. I enclosed the bottom sandbox with plastic "chicken wire" to keep the cats out. :)


Thu, 11/22/2012 - 13:05
This is an awesome build. love the colours too, could you share them with us, including the roof colour. Thanku
Thu, 11/22/2012 - 15:34
Thanks! Glad you like it!
The paint was from Dunn Edwards: Roof was "Louisiana Mud", playhouse walls were "Drifting" and then the white was a snow white from Lowe's.
The slide and accessories were also from Lowe's.
Tue, 04/15/2014 - 09:35
I LOVE this! This is exactly what I'd like to build. Do you have plans you can share with us? I think I'd also like to add a couple of swings on one of the sides too. Thanks so much!
In reply to Love this! by m7hennen
Sun, 04/27/2014 - 08:39
I know I messed with the dimensions a bit but I don't remember exactly. I made the playhouse larger (deeper and taller than original plans) . I also cut the roof line on the deck side for more room. I put aluminum over the wood on the roof and then painted. The Ball Wall was made out of plastic gutter pieces that I painted and we used practice rubber golf balls to throw into them. I hope that helps! We sold that house, so I can't go out and measure it :)

In reply to Plans for Playhouse by Dawnybb
Thu, 05/28/2020 - 15:32
You may not get this as this is an old post. Did you dig post holes? I have older kids and I am thinking about building a plan like this but at a 6ft height. Wondered how much it moves around when there are a bunch of kids on there. The house I will build is also 6 ft heigh.

Been wanting to make some Adirondack chairs for years; have about 10 different plans saved that one day I could get to. These 2x4 modern plans made getting them done quickly possible due to simplicity of the cut list and cheap cost of materials. The only real change I made was to use 2x6 for the arms; I cut a taper along outside edge and increased the length of the arms by about an inch and a half to overhang the front legs a bit. Since I just used basic framing lumber, I milled all of the boards first with table saw and planer to make square consistent edges. And, I chose to use pocket screws in as many joints as I could so I wouldn't have screw holes on any visible faces. Add in a lucky find at the big box store paint return; scored this blue exterior paint for $2.00 a quart, and my weekend project turned out pretty good. Now I've got two neighbors that want 'em.


I am so excited to post these pictures of the dog crate I built for my boxer. I was a little nervous about beginning this project. It was my first project - aside from the garden boxes. I bit the bullet and bought the Kreg Jig, and I'm glad I did! It is so easy to use. The project was easy enough, I did make a few mistakes along the way, but I was able to fix them easily enough. The pictures show the dog crate without the door, (we were getting our puppy used to the crate before putting the door on). As you can see, the kennel is big enough for a big dog, my niece and my nephew had fun playing in the kennel.


I designed this desk from another desk I built. With this one, I wanted the overall foot-print smaller but still something that was able to organize all our office stuff and be able to close everything to keep it clutter-free. We have a small apartment, and although this desk is about the size of an up-right piano, it works perfectly into our living space!
I made it out of raw hardwood (Ash) and because I knew just the wood alone would make this desk heavy/bulky to move I made the top hutch removable. It's held in place by wood pegs (dominos). All the shelves are adjustable and the drawers are full-extension (something I've never had - wahoo)! The drop-down door is help up by 2 pull-out boards on each side (my first desk had chains). I spend a lot of money on this desk because I knew it was a chance in a lifetime to make and wanted it to be perfect and something that would last generations.
I built the main carcass off of plans/measurements I designed, but then all the insides, drawers, shelves, doors, etc where made as I built (because just a millimeter difference in building changes everything)!
If you want more pictures/descriptions of the building process I wrote about it in a 4-part series on my blog.


Wed, 09/23/2015 - 11:22
is there plans available for this project?

In reply to is there plans available for this project? by Nsmjc
Tue, 09/27/2016 - 12:20
Hi there! I'm sorry but I don't have plans put together on it! I designed it in Google Sketchup and have some 'screen shots' I could send you for basic measurements if interested. You can e-mail me at [email protected]
Mon, 06/15/2020 - 09:08
Hi. Do you happen to still have those 'screen shots' or any other info/dimensions from this build? LOVE LOVE LOVE it!!

I adjusted from the plan to build the stools to 35 inches and found they remianed very stable! Used Cedar for the seat and aprons, and redwood for the legs and supports.
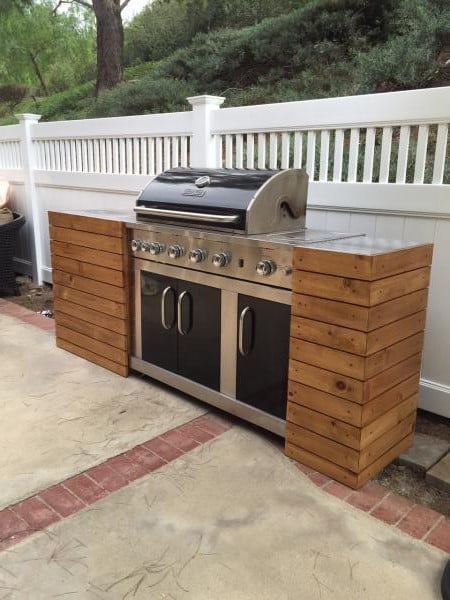
This was just a standard BBQ with an attached folding table. I used a combo of Ana's plans to add a little character and style to the BBQ and it made a huge difference in not only the BBQ, but also the backyard.

Mon, 05/23/2016 - 12:29
Hello: Very interested in which plans you used to build the BBQ Built In. Thank you.
Wed, 06/08/2016 - 09:22
Hello dbryant1977, please share the plans. Also, what's brand/model of BBQ? Very nice.
Thu, 04/09/2020 - 18:27
This is my guess on the plans used! https://www.ana-white.com/woodworking-projects/diy-grill-island-featuri…
Fri, 08/30/2019 - 09:50
Are there plans for this project or at least some pictures from while you were building it?
Thu, 04/09/2020 - 18:27
This is my guess on the plans used! https://www.ana-white.com/woodworking-projects/diy-grill-island-featuri…
Wed, 04/22/2020 - 15:52
Can you provide us with the plans for this? I would love to build one.

Mon, 03/04/2024 - 14:49
Hello: Very interested in which plans you used to build the BBQ Built In. Thank you.

“Just My Size Closet Plan” - Perfect for growing kids and more organization! @thegardnerplace modified the tower to include tucking away the laundry basket, SMART!

This project started because a corner bathroom vanity that fit my space requirements and budget did not exist. A plan specific to what I exactly needed also did not exist. After combing through what plans I found online, the Wall Kitchen Corner Cabinet best matched what I wanted. I modified it with the Momplex Sink Base Kitchen Cabinet in order to turn it into a sink base.
But, there was a problem. I hadn't actually built anything before. In order to get at least one project under my belt, I built the Vintage Step Stool. It turned out great, so I figured I was ready to go! Strangely enough, after spending about $100 and several weekends picking away at this project, it was done! It looked great, even. Then, I moved the vanity into the bathroom and realized that, while it may have looked great, it wasn't very square. Lesson learned was that this is a two person project. It is too difficult to keep things square and screw at the same time when there is only one person.
At this point, everyone was tired of having to use the kitchen sink to brush their teeth and wash their hands, so we needed to get this project done. $100 later, we had more material. Since I had figured out what needed to be done with the first vanity, let's call it our prototype, the second vanity went together REALLY quickly.
Within a few hours, it was pieced together. Since it was going to be painted, we used Bondo to cover up our imperfections. Yes, of course there were imperfections. While much better than the prototype, it still was only my third woodworking project. Sanding, caulking, and priming took another hour or so. A few coats of the finish paint went on, followed by a couple more coats of a clear sealer, and it was done.
We moved it into place, screwed it to the wall, put the soapstone countertop on along with the sink and faucet, and it truly was complete. Sink is Kohler, faucet came from our local Habitat for Humanity store and I'm not sure what brand it is, and the soapstone came from soapstones.com. If we had oiled the soapstone with mineral oil, it would be a very dark gray.


Although I didn't build this from a plan I wanted to be sure and share it as it is because of my experience building from Ana's plans that I felt comfortable giving this a shot.
My in-laws were just updated their lake cabin and wanted a storage headboard as space is a premium and it will be the only furniture in the guest rooms. It is unique as it has shelves on either side which can pull out to function as a small night stand, perfect for cell phones, books etc. The back of the piece is tongue and groove knotty pine which for the more rustic look they wanted.
I will probably do things a little different when I build the next headboard but overall I am satisfied with the end result. I chose not to do a lower storage area, mainly to keep the cost down. It could be done very easily but this piece is already very heavy and that there is plenty of storage.


Sun, 01/17/2021 - 15:15
Is it possible to get the plans for this headboard. My teenage son really wants a head board with storage.

View complete post at my blog: www.birdsandsoap.blogspot.com

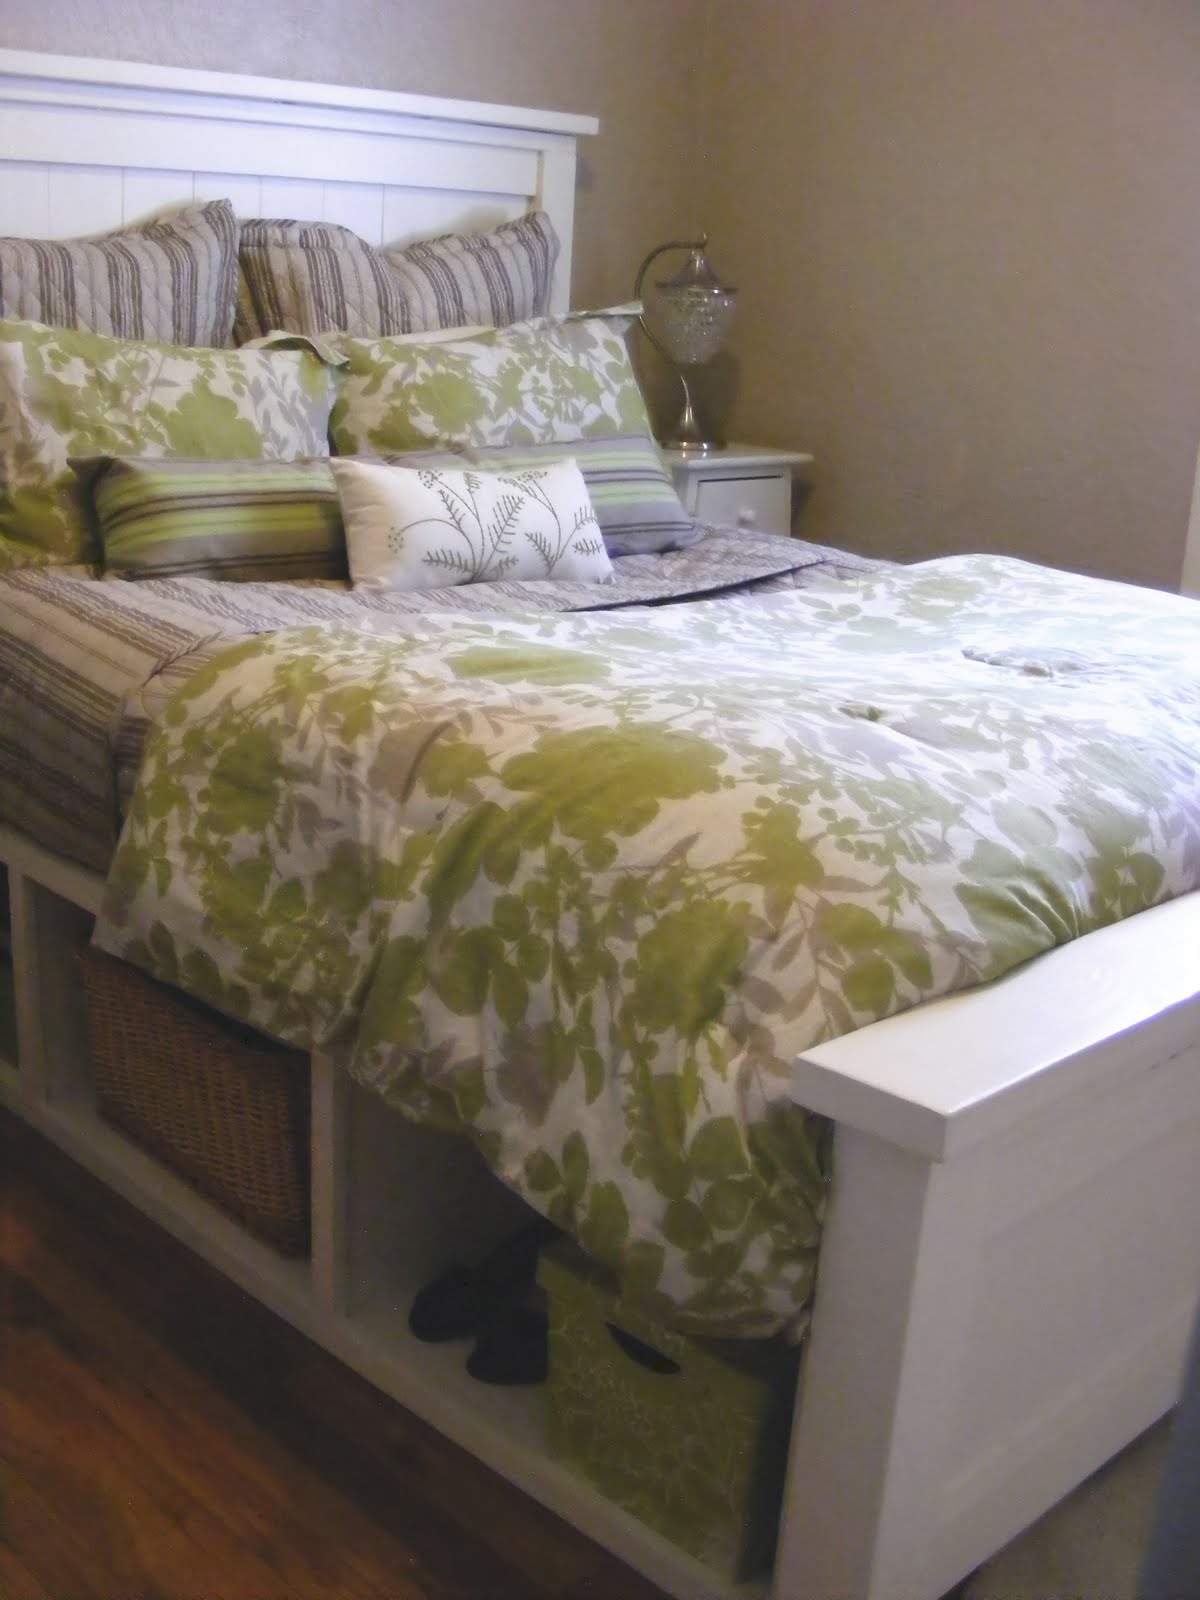
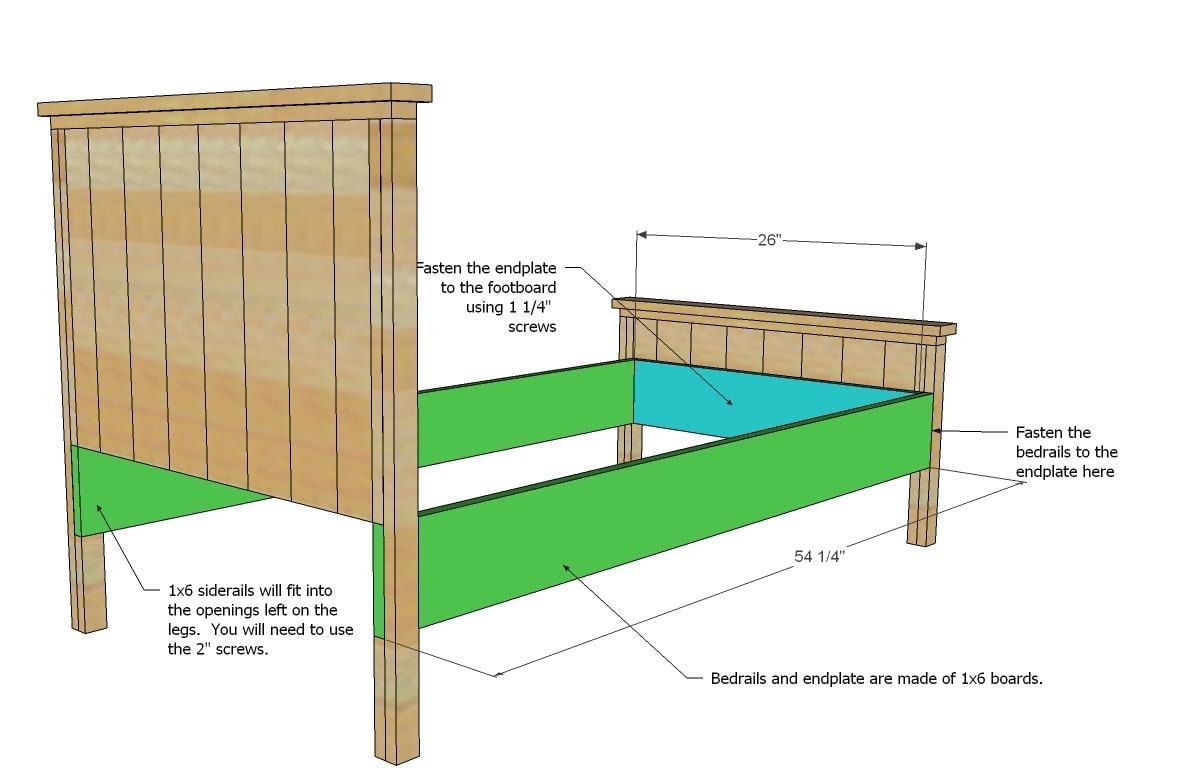
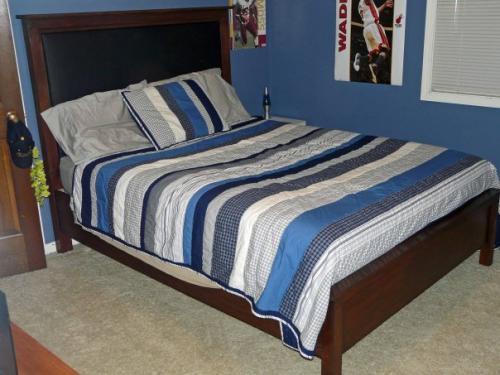
My Farmhouse bed is finished! After a week of building, a nice long month and a half of procrastination, and (finally!) one night of painting, I have finished my bedroom. I'm so excited to post this blog entry because I couldn't be more pleased with the finished product. You don't know how bad I was tempted to disassemble the bed and put it out on my front lawn to photograph! I had to literally stand in the closet, on the dresser, and in the hallway get a shot of our tiny bedroom.
This bed is a variation on two plans from Ana White, it is a modified version of the Farmhouse bed and the Captain's bed plan, plus some of my own ideas for good measure.
I call it the "Farmhouse Storage Bed with Hinged Footboard."
I fell in love with the Farmhouse bed and knew it would definitely be my next project. I particularly love the tall headboard that sits so prominently above just begging to take notice. It is bold, timeless, and not too stuffy all at the same time.
I also love the footboard in this plan.
Here is my little ditty on footboards: A good footboard sits below the mattress; perfect for my husband and I since we hate knocking our feet into wood while we are trying to sleep. This footboard gives a nice clean, stylish look, yet sits low enough that it doesn't get in the way of our tootsies. You need a foot out to cool down a bit? No problem here. I feel that it is super important not to compromise on functionality for style especially when you are making your own furniture. By the time the project is finished, if you are like me, you will not be making further adjustments anytime soon. It also has nice depth of six inches which makes it great to sit on in the morning while putting on your shoes and socks.
The picture below is one of my favorites. This is a bragpost submitted by boxermum and I think it turned out fabulous! I love how beautiful the distressed finish turned out. Originally this was/is my plan. However, I love my bed just the way it turned out for now. I figured I would see how the finish holds up, and if it starts to look banged up in a year, I'll go all the way and distress it with a nice stain because once you distress a piece, you are committed.

With this plan in mind, the only thing missing for us was storage. We live in a tiny house and need every bit of space.

I loved the storage cubbies in the Captain's bed design (finally a place for all of our shoes; they triple overnight around here), yet was not a fan of the box at the end. I didn't like how it looked from the side view either, and I was set on incorporating the footboard from the Farmhouse plan.
So I decided to combine the two.

Following the directions for the Queen farmhouse plan, omitting the side rails, and adding two long storage cubbies to serve as the mattress platform, I set out to make the ultimate bed. I wasn't far into my plan when I realized that the cubbies would be a full seventeen inches high, and that meant that there would be some valuable storage space between the two and a perfect place to store our off-season clothes. So I devised a plan to make the footboard on a hinge that would lock in place and allow me to get under there without having to pull off the mattress and remove the slats.
Voila! Check out the hinging action:
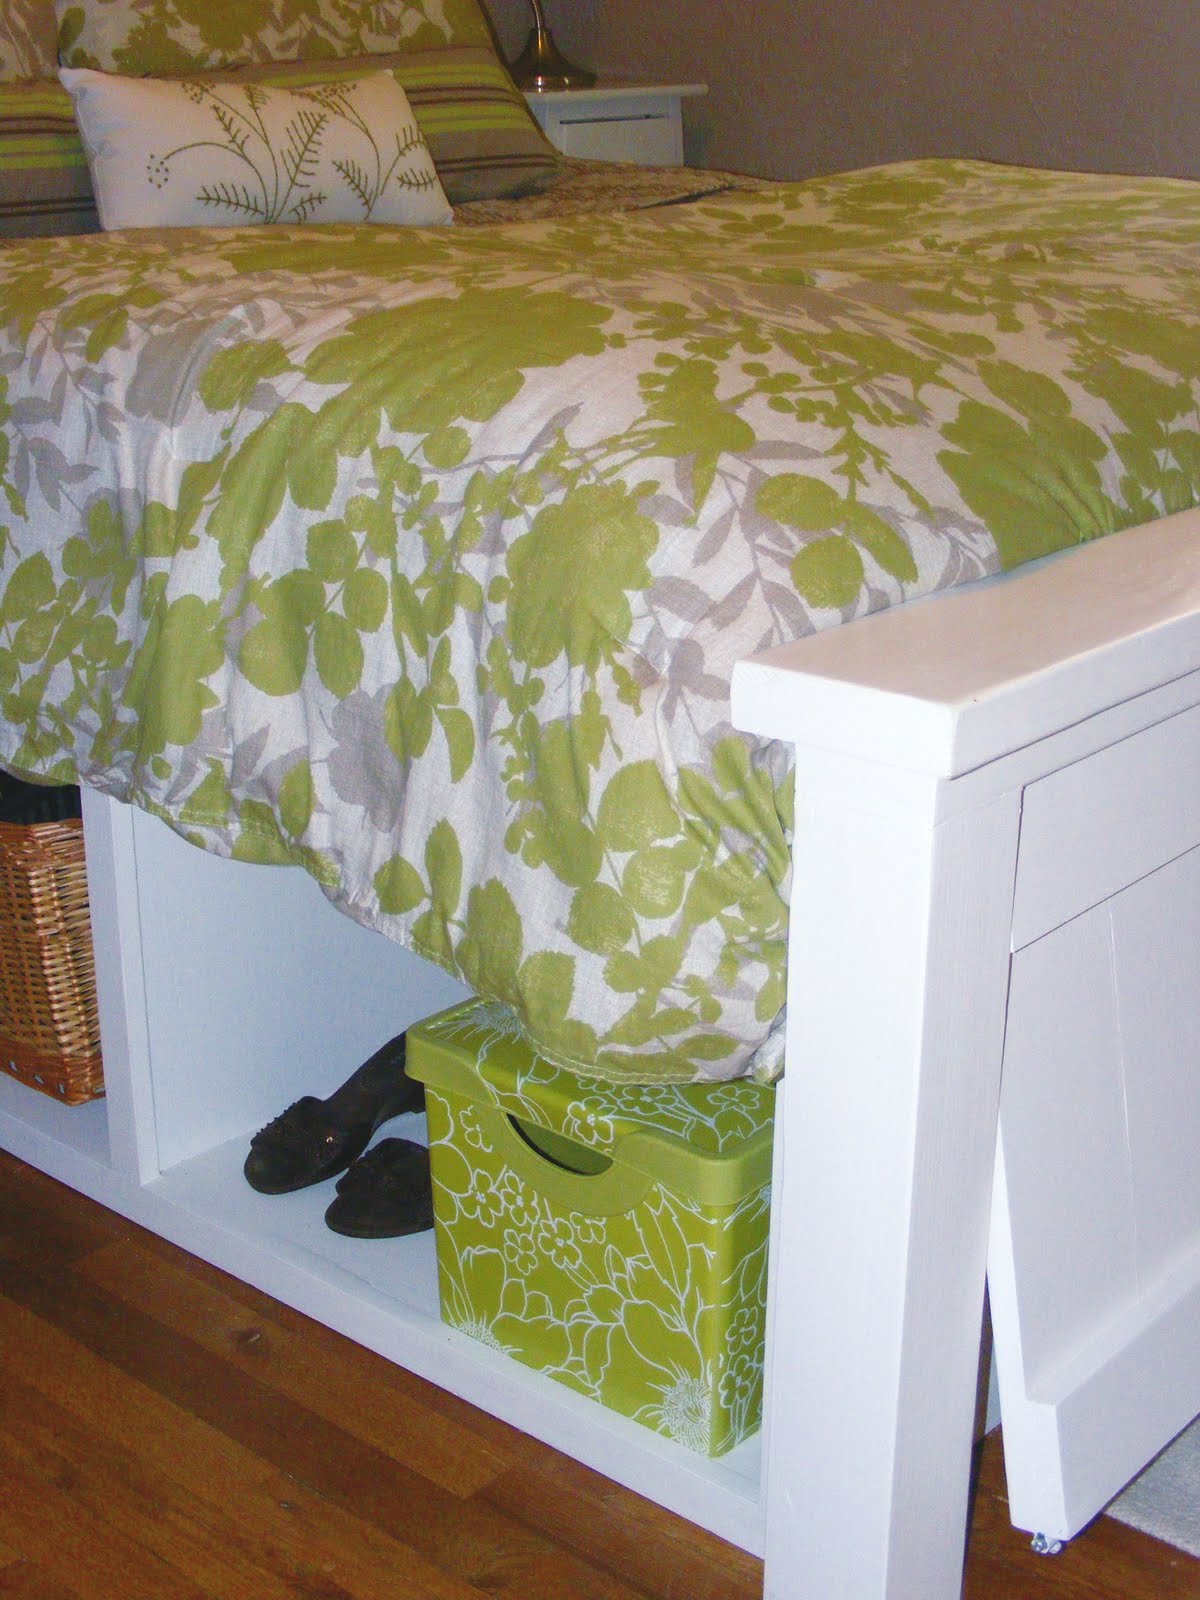
This is my daughter demonstrating the massive amount of storage space that would otherwise be lost for all eternity:

She could totally sleep in there. It's like a panic room. If the Nazis come, we're under the bed and they'll never find us.
So here is the breakdown of my bed design:
A cost estimate is of course double what I had planned. The original Farmhouse was around $120 for materials, but with the addition of the storage cubbies, it was another $100 when things were all said and done. Still, well worth it, in my opinion. I'm not running down to Pottery Barn anytime soon and dropping a thousand dollars on a bed, are you?
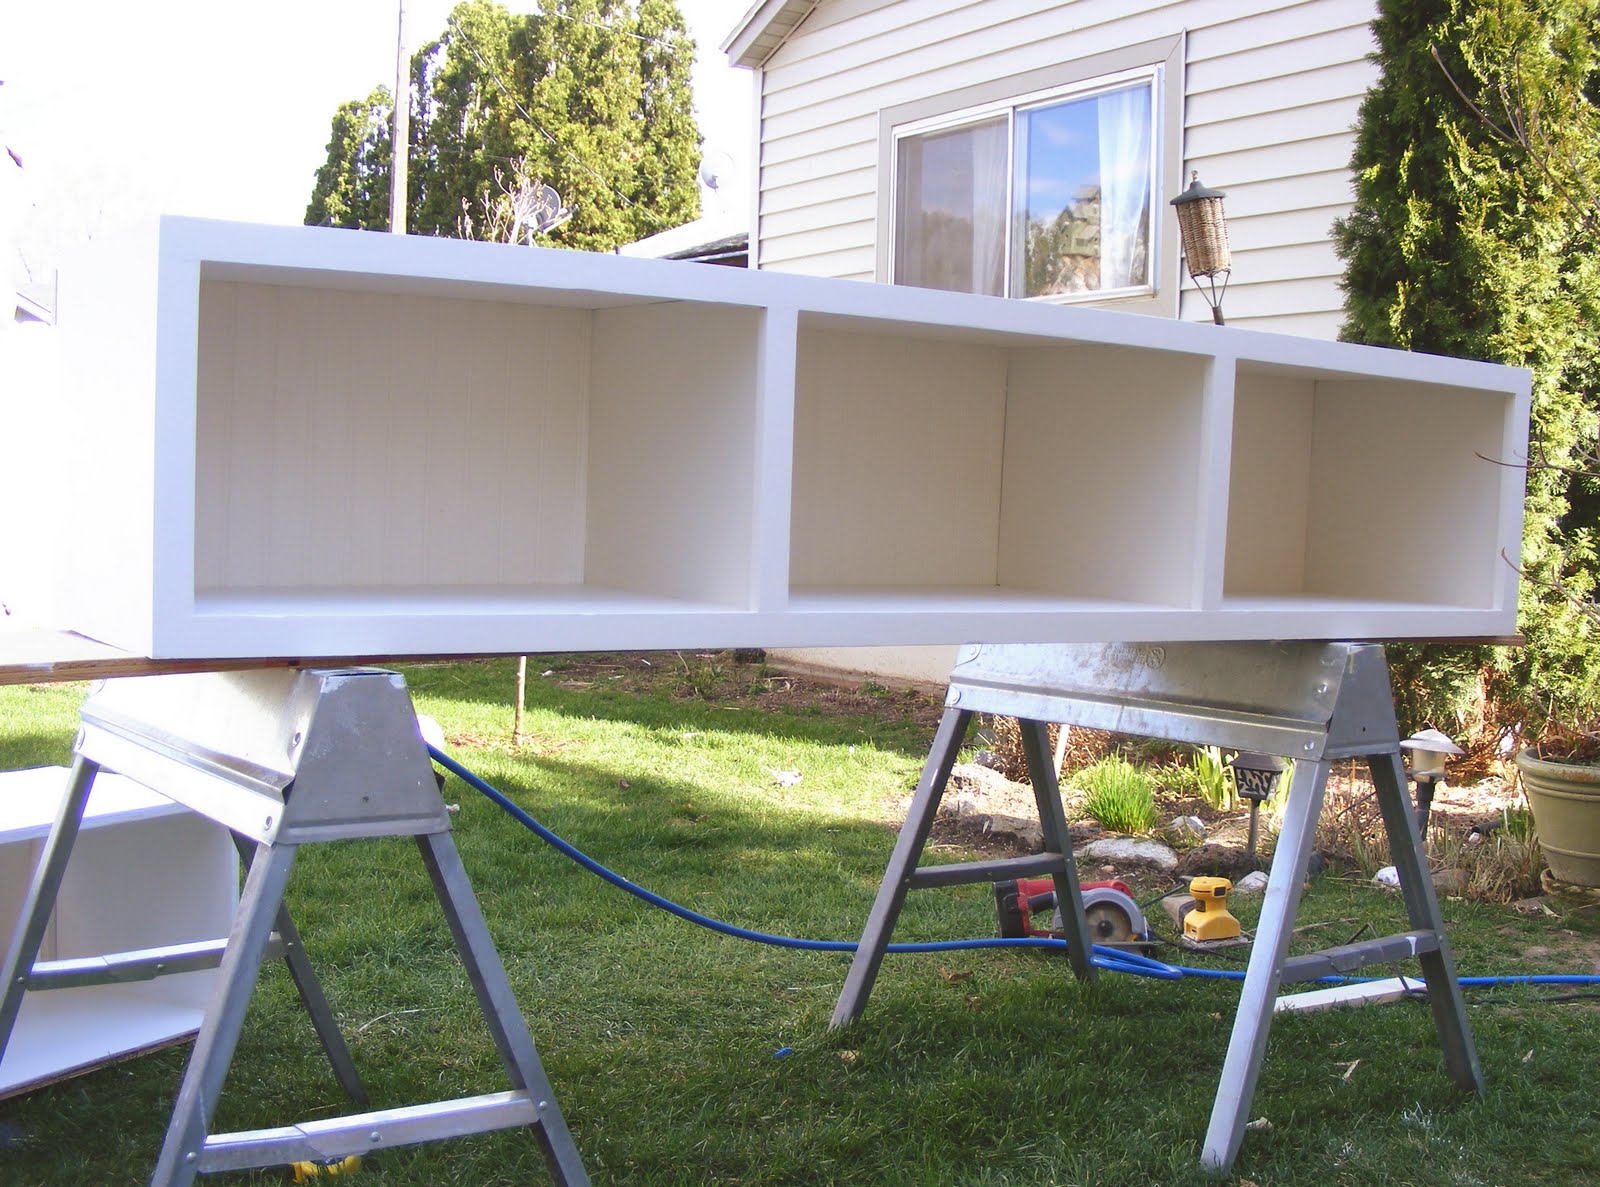
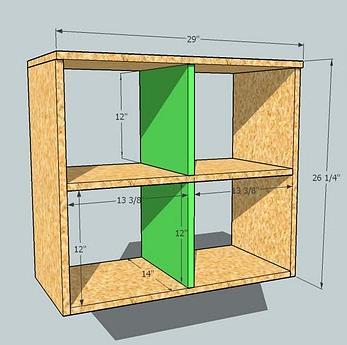
I started with the cubbies first. Since the storage would be exposed on the sides of the bed only, I made the length to be exactly 80 inches, accomodating the entire length of a queen-sized mattress. I also wanted a deep storage space since many of the cute storage baskets are larger than twelve inches deep (plus shoes, remember?). So I chose a depth of 16 inches. Same goes for height. I noticed that the twin Captain's bed plans made called for cubbies at 15 inches high, but when I compared it to the Farmhouse plan, the top of the mattress would sit around 25"... since I wanted to make my mattress height appropriate to the Farmhouse head and footboards, I went with the 17 inch height for the cubbies. I chose to have 3 sections, each one being around 25 inches, plenty large to accomodate large baskets.
For the storage box building material, I chose 3/4" plywood, 1x2's to frame it out, and 1 sheet of 4x8 composite beadboard for the backing. Plus a few 1x3's to make the bed rails and slats in the center. I followed the building instructions for the Captain's bed, adjusting the numbers for my plan dimensions.
I purchased two sheets of plywood at Lowe's and ripped them at 16 inches wide for the top, bottom, sides, and dividers of my boxes. You end up with enough to make one box and some scrap from each sheet

(2) top pieces of the boxes measure 80" in length.
(2) bottom pieces measure 78 1/2" in length (allowing the end pieces to attach under the top piece)
(4) side or end pieces measuring 16 1/4" inches high (a 3/4 inch difference to allow the thickness of the top piece)
(4) dividers measuring 14 3/4 inches high. Make sure to refer to the plan instructions for the Captain's bed. The bottom piece is screwed in 3/4 inch from the bottom of the ends to allow for the front trim piece to be flush with the shelf bottom. I placed the dividers at 26" in from the sides, making each cubby space nearly equal (the center section ends up being around 25 1/2" after factoring in the 3/4 thickness of the plywood).
After I built the boxes, I trimmed them out with the 1x2's. Rough estimates for the length are as follows, but I recommend piecing them in after your boxes are finished, you end up with slight variances in length due to the nature of these things.
(4) 1x2's at 80" long
(8) 1x2's at 14" long (some of mine were a little less on the inside divider trim)
I worked my tail off sanding and filling. It took me two days (mind you, I've got the kids to raise as well) to complete the first box because I wanted everything to be completely smooth. Lots of sanding. However, the second box only took two hours! I filled sanded and primed my plywood before I assembled the boxes, it went quicker during assembly because I only needed to fill and sand the joints and touch up the primer. I loved using my nailgun for the trim, it is so fast and effortless!

When I was finished, I had two beautiful storage boxes. I cut the beadboard at 17" high (using the 4' width and two pieces to cover the back of the box...where my seam was, I was careful to sand and prime the joint beforehand, as well as tape the back to hold in place while the glue dried. Initially, I debated cutting the backing for each divider section so I could attach it behind the plywood dividers where no seams were visible, but I wouldn't have had enough length from one sheet of beadboard, plus there would be a ton of scrap. It turned out great, and only a perfectionist like me would care. I don't even think you can see anything since it sits on the ground and especially once all of your stuff is jammed in there.
Oh, and I attached the 1x3 rails along the back too, making sure to screw them in to the plywood 3/4" down from the top so that the slats would lay flush with the top of the boxes. the rails were 80" long and I measured my slats to be 28" wide. A queen mattress is 60" wide. I added two inches to the width of the bed because I didn't want the mattress to hang over the boxes and I knew that the sheets and other bedding would bulk things up (mattress+ cover+ featherbed+ sheet+ comforter). Here was my math:
3/4" trim +16" box depth +1/4"beadboard thickness = 17" x 2 boxes = 34"
60" queen mattress width - 34" for box widths = 26" slats +2" for wiggle room = 28" slats
We put the bed in our room and threw out our old boxspring. I was a little nervous to sleep without a boxspring, I thought our mattress might start sinking in the middle. Ana's directions said to place the slats close together and it would be fine. I think I used 10 or 12 slats and so far, the bed is holding up well.
Once those were out of the way, I turned my attention to the headboard. I began to assemble the center panel following the directions on the farmhouse plan. However, I noticed that in the farmhouse design, the bed rails attach to the INSIDE of the headboard posts, and since I had forgone the rails and made the storage boxes, I wanted them to attach between the headboard and footboard, CENTERED on the posts, not to the inside. Also, we live in a tiny house with a tiny bedroom, and leaving the posts to the outside would make our bed a near miss to our closet door in a tight space.This required me to make some adjustments. I had to narrow the widths of the headboard and footboard so that the storage boxes would attach on the center of the posts. According to Ana's plan and my plan, I had to shorten the headboard and footboard by 2". Of course I had already built the panel, and it was tricky to use my circular saw to cut through 3 pieces of wood at once, but I managed.
Here's me cutting down the footboard to length: (notice a missing 1x4 on the bottom "sandwich," I'll tell ya why later)
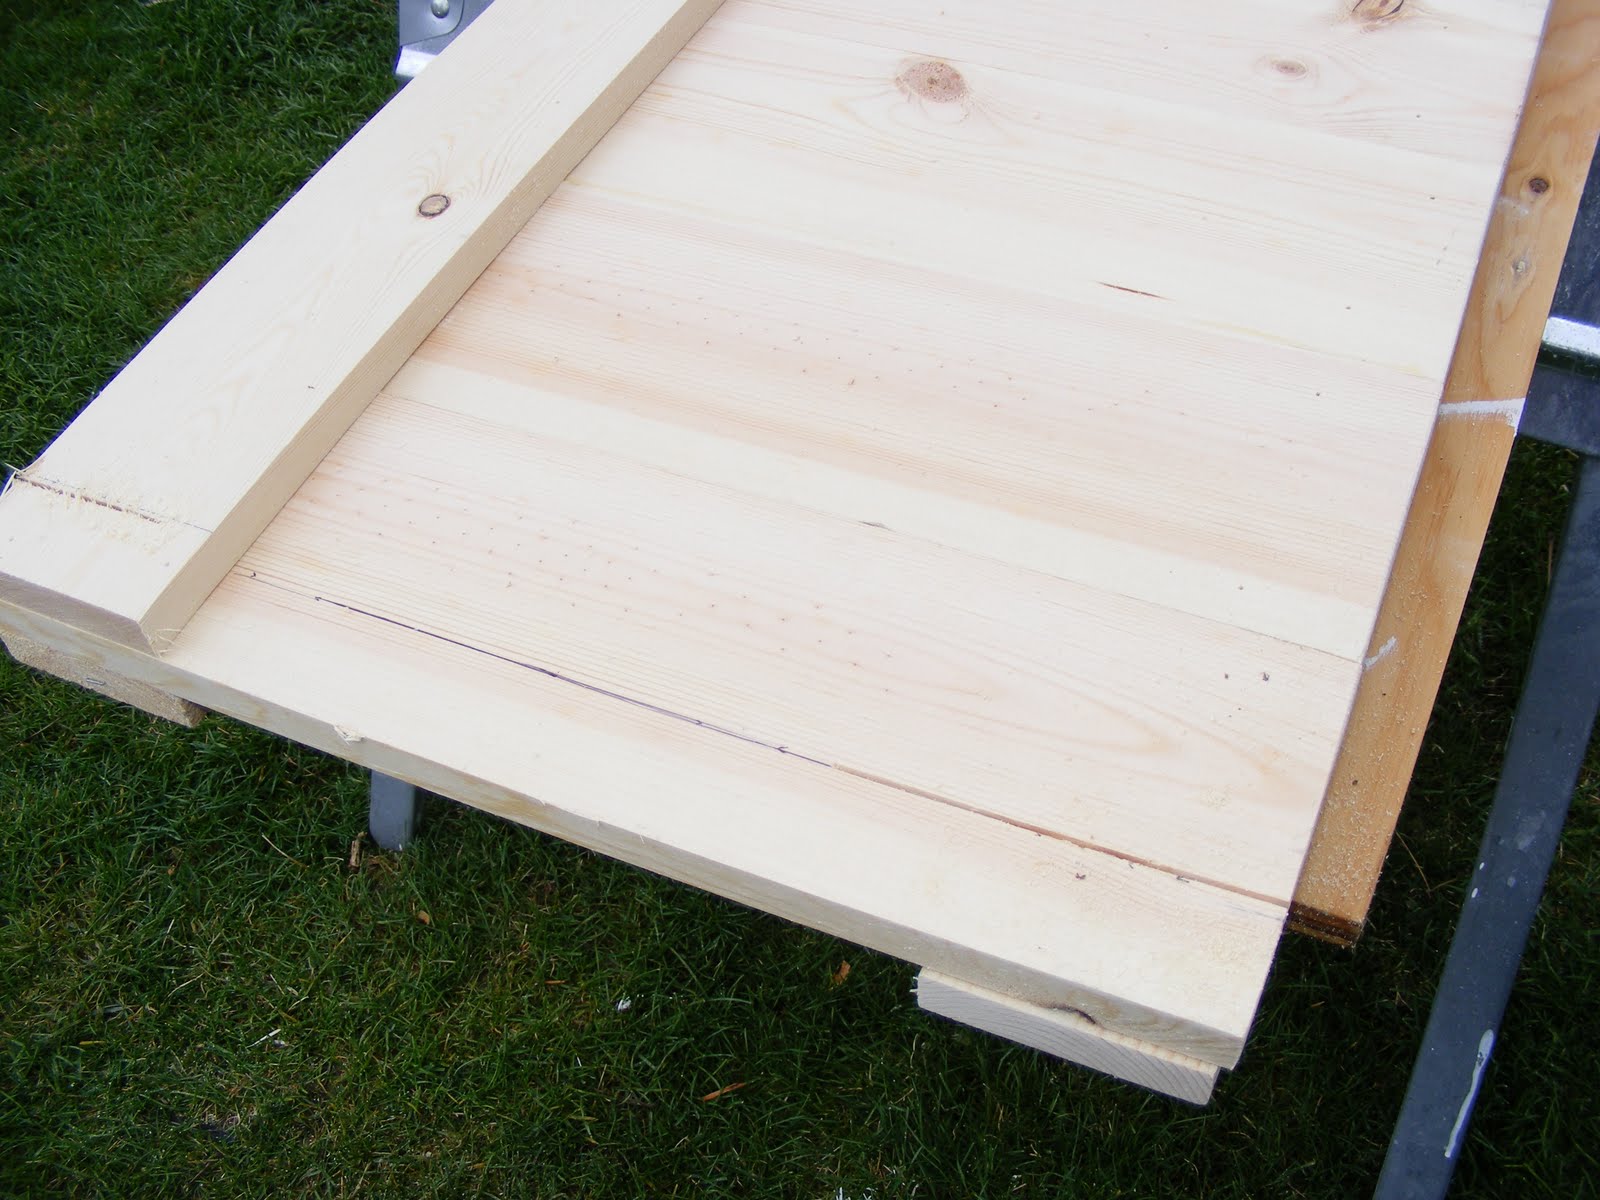
This also meant that the cap pieces, the 2x4 and the 2x6, would also be 2" shorter. No biggie.
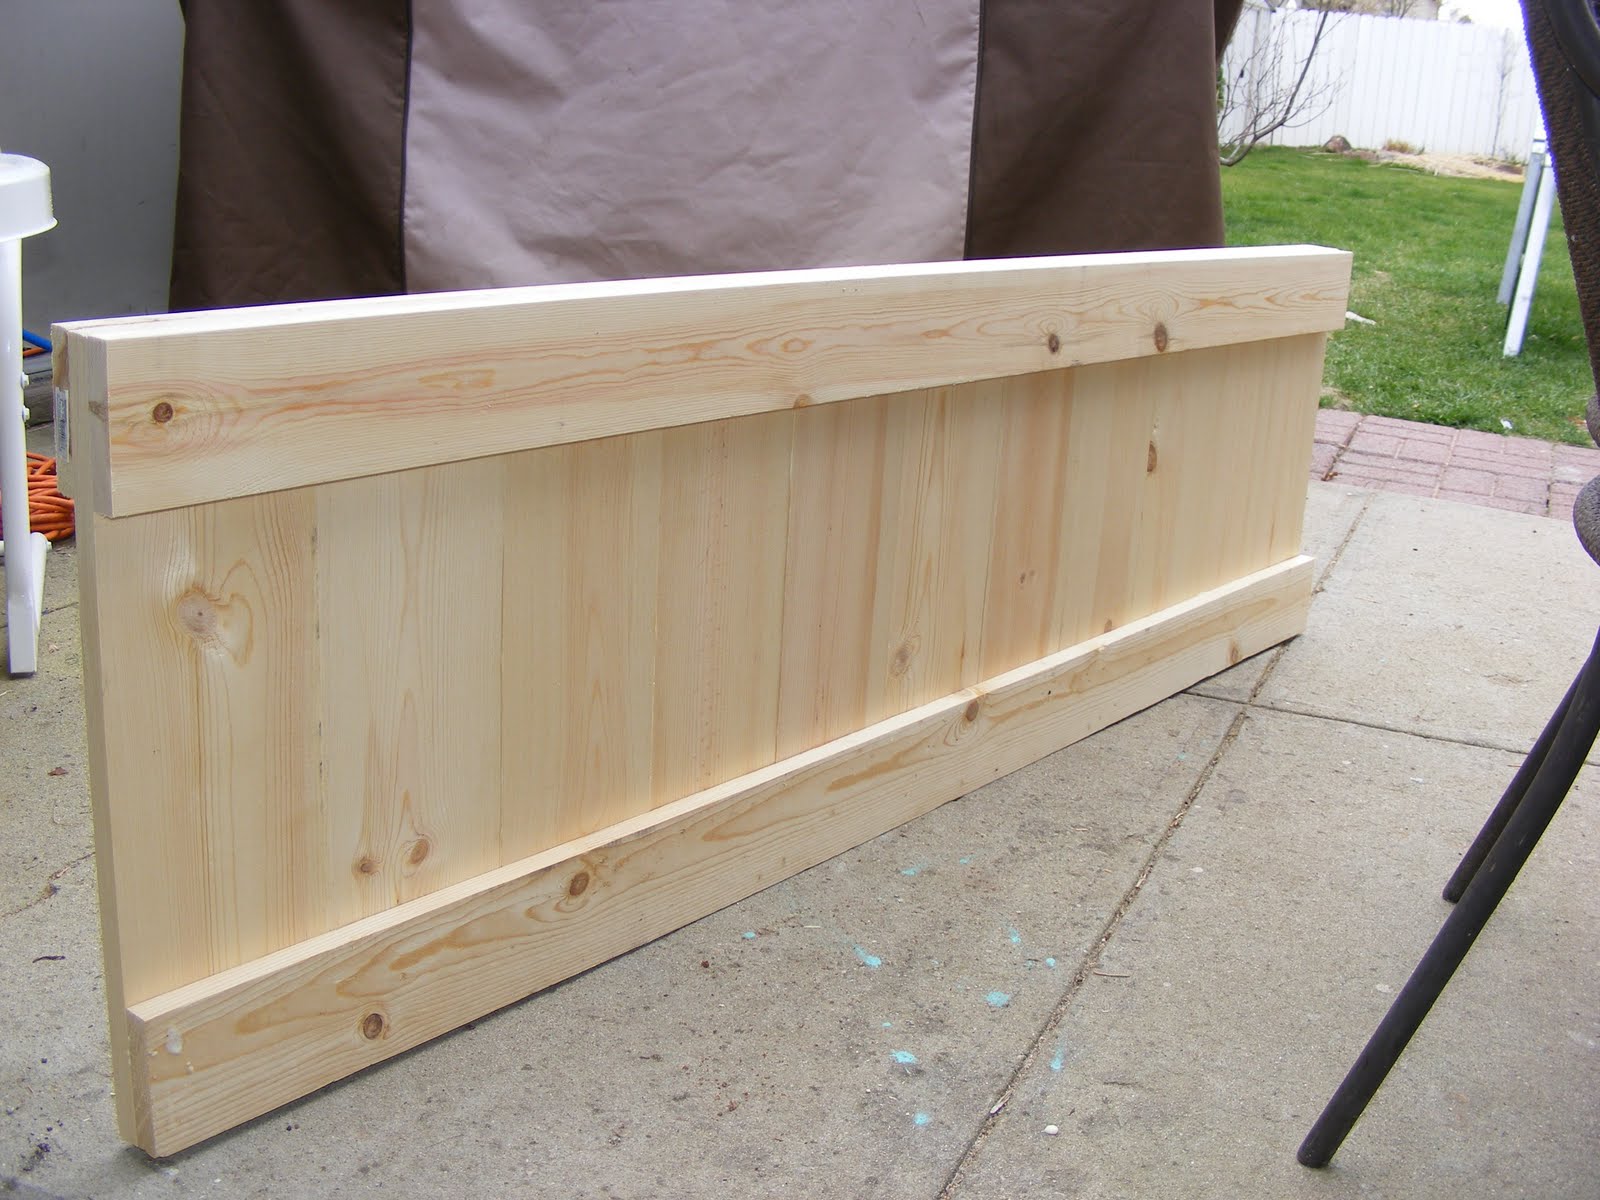
Headboard is done:

Always some excitement when you are DIYing, right?
Next came the part that was my own genius. The hinged footboard.The first thing I did was add two inches to the length of the panel. Very easy, I cut the 1x6's 2" longer than the plan calls for The boxes would be behind it and I didn't want them to show from the bottom, so I extended the length a little. Totally optional.
* Don't forget to sand the edge along the length of the 1x6's. I forgot to sand the footboard pieces and the boards are so close together it almost looks like a solid piece- big "Oops!"
Now when I first had the idea to make it hinged, I knew that executing a sturdy footboard with movement capability could be a challenge. Does this come to anyone else's mind?
"When this bed's 'a rockin,' don't come 'a knockin'!"
Anybody?
Bueller?
Bueller?
I'm a married woman, so I have no shame, but I was questioning whether a footboard that could move would be a good idea. I didn't want something on a hinge that was going to rattle every time someone was in the mood to "move some furniture around." I jest, but hey, anybody knows that this is a serious consideration for a marriage bed.
wink. wink.
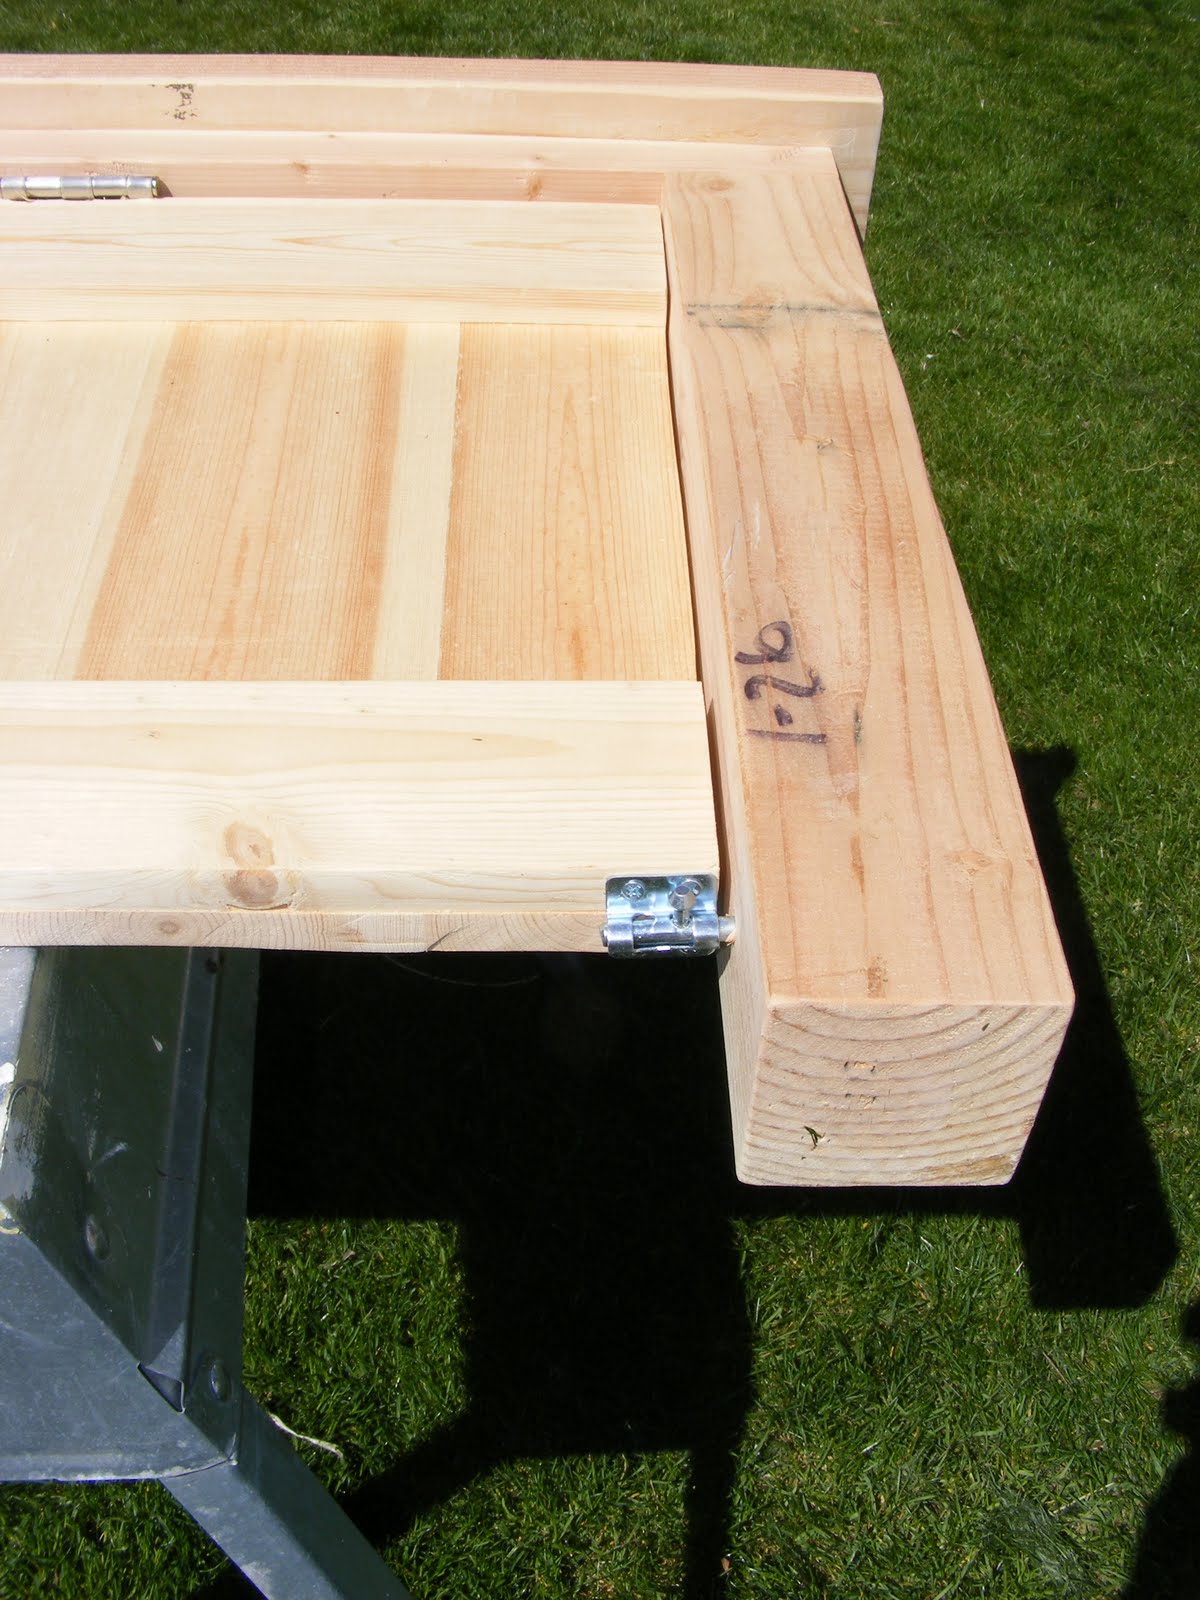
This is what I came up with: I purchased two regular old door hinges and two barrel bolts from Lowe's.
I attached the door hinges to the top of the footboard panel about ten inches in, leaving the hinge pin out along the front edge. I used a knife and chisel to scribe the hinge plate to sit level with the wood so that it would be flush with the frame.
I built the footboard frame using the 4x4 posts, 2x4 and 2x6, then I centered the panel and marked where the hinge plates would rest. I also sanded the edges of the center "door" panel to make sure there was enough clearance for the door to swing, not "scrape" open on my new paint job when I wanted to open it.

There's my dog, checking out my handiwork.
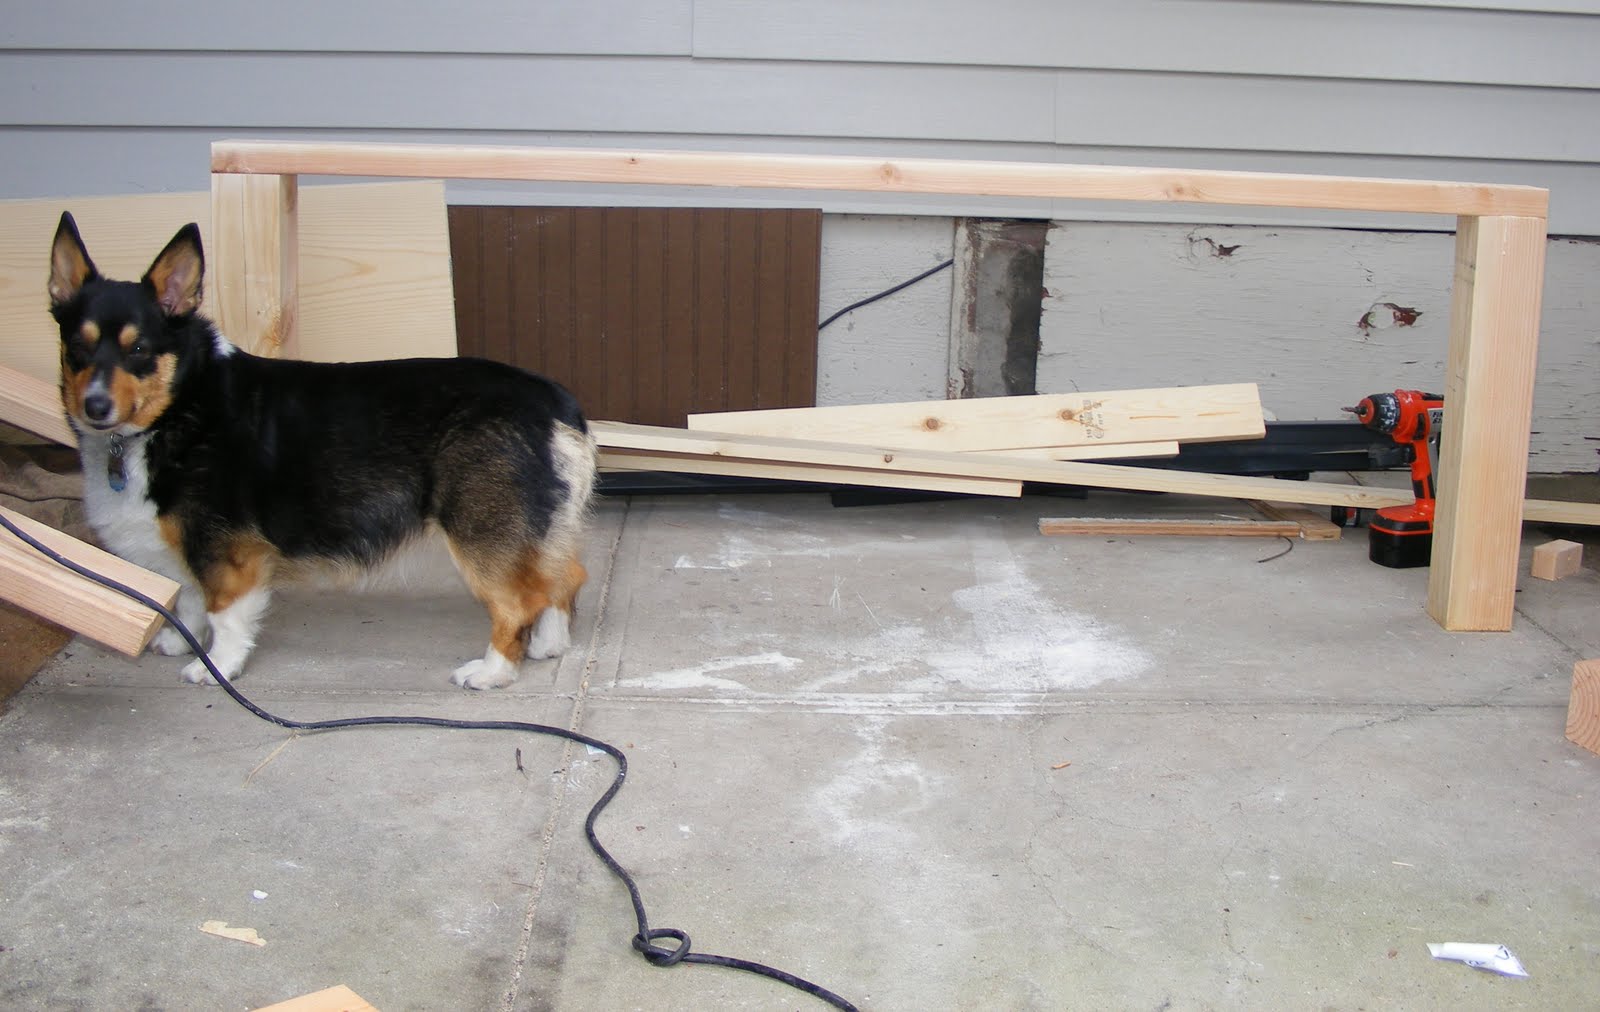
I attached the footboard panel to the footboard frame by predrilling and screwing in the hinges. I attached the barrel bolts to the bottom corners of the panel. Notice that I did not put the 1x4 on the rear side of the bottom panel. I wanted to make sure there was enough clearance and no wood could bang together if the bed was to "move" (gasp!).
Here's what I got:
I made ABSOLUTELY SURE that the holes I drilled into the posts for the barrel bolts were just the right size. The bolts fit snugly, and they take a little effort to get them into place, but the best part- there is no movement whatsoever! I also used 2" wood screws to secure the posts to the storage boxes. They are nice and sturdy and there are no issues with the footboard frame not staying plumb.
Score!
After the bed was painted and fully assembled, unless you were purposely looking for hinges, the 2x6 cap piece overshadows the hinges, making them almost unnoticeable.
Well, that's my new bed. It's awesome. I couldn't be more thrilled.
I also treated myself to a "Mother's Day Gift" of brand new bedding...It's from Kohl's in case you're wondering. Sonoma Life and Style, "Pacifica." It's got my favorite shade of green.
And new paint on the walls too. Great color, this taupey grey is so "in" right now. And it goes with the bedding perfectlyl. It is Valspar from Lowes ( I love Valspar, great coverage, one coat!), color is called "Lyndhurst Gallery Beige" (2006-10-B).
It's so great to have a "new" room. I've been making my bed every day since I moved it in there. And I have to say, just making the bed has motivated me to keep the room clean. Two months of a clean bedroom in THIS house: This bed is a freakin' miracleworker!
Next, I am planning some new art over the bed, I think I am presently in love with this:
I love birds in case you didn't know, and Jesus too...and my husband. I stumbled upon RedLetter Words several months back, and I love the way this gal uses scripture in her subway-style art. Paint the door posts because I want one for every room!

Sun, 12/29/2013 - 23:57
Great designing. Didn't know they have that in kohl's. Gotta run to see if there's some stocks available.

Wed, 07/27/2011 - 09:56
This is just so smart! You've wasted NO storage space! I'm super impressed and inspired!
Wed, 07/27/2011 - 10:10
I absolutely love this. I've been wanting something similar and the hinged footboard is a wonderful solution to storage issues. (I have a king size bed and there would be a fair amount of empty space in the middle of the bed if I put a footboard on it.)
Seriously, amazing job!
Wed, 07/27/2011 - 10:11
Wow! Excellent job! I'm super jealous of the extra storage space. I'm bookmarking this for kiddo #2's room. Thanks for the inspiration!
Wed, 07/27/2011 - 10:57
I love this idea! I was thinking about modifing the queen farmhouse bed for my expanded queen bed (66" instead of 60"), but I really like your ideas for incorperating the storage under the bed. I live in a small house and extra storage is always needed. Thank you for the detailed plan - that helps so much!
Wed, 07/27/2011 - 11:20
You thought every aspect through! The modifications are superb. When I built mine, I left the bottom king bench unattached so that I could hide presents there around holidays, but your idea is GRAND!
Also, I deliberated a long time over whether to stain or paint white. I finally settled on stain because I felt it would be easy to write off errors as "rustic-looking," and it wouldn't get scuffed by shoes, but your white set is brave and fantastic!!!
Wed, 07/27/2011 - 11:36
Nice job! The bed, the photos, the brag post...all of it is awesome :) My hubby and I got a good laugh out of the..um.. 'wording' on this one! I just love all you folks here. Ana--you sure know how to put together a solid network!! Again, GREAT JOB!
Wed, 07/27/2011 - 17:37
This is just beautiful! I am so happy to see someone else put these two ideas together. We finished our Stratton bed portion about a month ago. We plan to build the farmhouse head board in the next couple of weeks, but the foot board on a hinge is GENIUS. I think we may just do that. Thank you for a great idea!
We used a decorative trim for the facing that we've used throughout our house on different projects, but all in all, ours looks just like yours including color. I will post on our blog page on Ana soon.
I got sick of looking for baskets that fit like the Pottery Barn bed, and, of course, PB doesn't actually SELL replacement baskets that go with the bed, so I made little curtains on spring-rods to cover up our junk under the bed. I think it looks great.
Thanks so much for sharing this. LOVE IT LOVE IT LOVE IT!
Wed, 07/27/2011 - 12:51
I positively LOVE this!! I have been looking to incorporate the Farmhouse bed and Captain's bed myself and was debating on how to do it--have been debating for about 3 months. You (and Anna of course!) are geniuses. Thanks for doing all the hard work so I can shamelessly copy. LOVE IT.
Wed, 07/27/2011 - 12:58
This is exactly what I needed! I was planning on building the Queen Farmhouse bed for my daughter and now this is an even better solution. Thanks for sharing.
Wed, 07/27/2011 - 13:26
...for sharing this great idea and how you did it.
I would like to do this, too!

In reply to Bedding by kristenlotz
Wed, 07/27/2011 - 13:53
It's my favorite shade of green! The deets are near the bottom of the post. Bedding is from Kohls, and I've included the wall color too!
Wed, 07/27/2011 - 15:53
Your kindness is so appreciated! I can't wait to see if anyone makes these plans their own. Necessity truly is the "Mother of Invention." Small spaces and small bank accounts can generate some great ideas, I've seen so many on this site. Thank you Ana for your awesome and FREE plans! Feels so good to take something and make it my own! (and not to mention the great comments, I'm feeling pretty special today!)
Wed, 07/27/2011 - 17:15
OMG we are doing the same thing. I love your version though. We did the fancy farm house headboard and foot board to match. Except no hinged foot board. I love it!!!! But too late for us I already made the foot board and gonna do something different for the storage. LOVE IT!!! great job!!!! wish You had posted this 2 weeks ago I so would have copied you. your third bench was out of square so we scraped it and trying a different approach.
Again LOVE it. Maybe that will be my guest bbed. GREAT JOB!!
\
Wed, 07/27/2011 - 18:02
I really like the functionality of this as well. I always liked "pretty," then met my husband, whose family was very strictly "functional." I have come a long way in our 8 years together, so I do appreciate functional, but I do so love (ahem, prefer!) when it can be pretty too!! Your bedroom looks like a lovely retreat!! I was wondering where you got your bedside "lamps," I love them!!
In reply to I really like the by Shauna (not verified)
Thu, 07/28/2011 - 00:52
I got them at Target forever ago, 5 or 6 years maybe...I've been moving them around the house ever since. I loved them so much that I couldn't bare to get rid of them. They go perfect with my new room, it's like they were just waiting around for their moment to shine!
Wed, 07/27/2011 - 18:34
I did the same sort of mod to the storage bed plans, mine with deeper drawers all along the sides. We made the one nearest the head narrower, about 16 inches, since that one will be more difficult to access when there's a nightstand in place. I took a break after assembling the long drawer-boxes and slats, and haven't built the head- and foot-boards yet. Since I've had some time to live with that in-between under-bed space, I really hate to lose access to that, but hadn't thought of a hinged foot-board. Such a good idea! Thank you for posting all the detail and photos!
Thu, 07/28/2011 - 08:20
To me, this is what building yourself is all about--making the furniture work for you and your space. Your bed turned out fantastic! I loved reading about your ingenuity with the plans. And thanks for the laughs this morning as well :)
Thu, 07/28/2011 - 16:44
Finally, a place in the house and out of the way.
I am so going to steal this idea.
Thu, 07/28/2011 - 18:05
Would love real plans for this so we can make it too!!
Wed, 10/12/2011 - 11:09
I wish I had thought of this! We're just planning to lift the mattress every time we need to, but this is a brilliant idea! Great job!
Fri, 11/04/2011 - 22:07
Great job! Thank you so much for sharing how you accomplished the hinged footboard! I'm hoping to get started on this bed very soon!
Totally off topic question, The bird picture that says "His eye is on the sparrow and I know he loves me", what does that mean? I know I'm interpreting it totally wrong, lol.
Sat, 11/05/2011 - 11:22
That is a verse from an old hymn called "His Eye is on the Sparrow." It was inspired by Matthew 10:29 "What is the price of two sparrows- one copper coin? But not a single sparrow can fall to the ground without your Father knowing it."
This is Jesus talking to his disciples. In Bible times, sparrows were sold in the marketplace, two for a penny (they were used for purification rituals or whatever). They were considered the least valuable, and since they were birds, even less valuable than say, larger animals like sheep or goats. God is describing His Providence over all creation, how He is watchful of the very the least of His creation. This is to remind His followers that they should not be troubled by the fears of man because God values them above all creation. If he takes care of the birds, why wouldn't he take care of us?
Jesus' parables were spoken with words meant so that every man could understand, he was always using a word picture to describe heavenly things with earthly words. It just gets confusing when you're talking about birds and half-pennies, but hat was the reality of the day. There were no dollar stores back then, haha.
Anyway, the song is really beautiful. It has been around forever. I think my favorite version is Lauryn Hill singing it in Sister Act II . Still one of my favorite movies!
The Song reads:
"Why should I feel discouraged, why should the shadows come?
Why should my heart be lonely and long for heav'n and home?
When Jesus is my portion, my constant friend is He
His eye is on the sparrow, I know He watches me
I sing because I'm happy, I sing because I'm free
His eye is on the sparrow, and I know He watches me
Let not your heart be troubled, His tender word I hear
And resting on His goodness, I lose my doubts and fears.
Though by the path He leadeth, but one step I may see
His eye is on the sparrow, and I know he watches me..."
Yeah, that was long, but you did ask, lol. God always tells us in His word to cast our cares and burdens on Him and he will lighten the load. This song reminds me that even in dark times, He is always there beside me to walk me through my crisis. His love never fails!
In reply to It means... by birdsandsoap
Sat, 11/05/2011 - 22:23
Thank you very much! Great explanation and totally off from what I was imagining. lol.
Sun, 11/06/2011 - 21:25
Ok, I'm sorry, realated question, lol. I see your storage pieces sit right on the floor, and there is space underneath the footboard. Is it very noticable? I was debating on whether to have the storage boxes lifted like in the storage farmhouse bed plan Ana recently posted, or have it like yours (so it doesn't become a collection place for dust and socks, lol). Part of me feels it would look awkward, but it really doesn't in your photo's. What do you think? How high off the floor is your footboard?
Thank you so much for your help!
Wed, 11/09/2011 - 22:12
When I was building this bed I thought the exact same thing! I didn't want two white boxes showing behind the footboard looking like they're not supposed to be there. So, when I modified the farmhouse bed plan, I extended the length of the footboard panel by 3 inches or so. The side posts were kept the same length so the panel just sweeps the ground closer than the original plan. Worked out great! The boxes are right on the ground and the footboard panel extends low enough that I don't notice them. I have a tiny bedroom with just an aisle around the bed, I don't know what it would look like if I had a big giant room and you could see the footboard from a great distance, but I think it's pretty safe. There is probably a 1-1 1/2 inch clearance (and yes I frequently find socks under there, but that's where the hinge comes in handy. I don't have to poke 'em out with a stick like when they get under my dresser, haha). Also, the storage boxes are attached to the posts, which makes them set behind the footboard panel by a couple of inches. Don't notice them at all.
Fri, 12/16/2011 - 05:39
[b]Top movies collection[/b]
[url=http://topmoviecollection.net/videoportal/load.php?sid=1][img]http://2…]
Sat, 12/31/2011 - 18:17
Your bed is just beautiful. I was thinking of making the captain bed for my son, but was wondering if you can feel the difference without the box spring? I've never tried a bed with slats before.
Sun, 01/01/2012 - 00:27
I really can't feel any difference without a boxspring. I would suggest that you screw in the slats though. I left them floating just cause, and when we flipped the matress they all slid toward the front of the bed. Our mattress also has memory foam, eggcrate, and a featherbed so there is a ton of padding on top. I have more trouble with the featherbed creeping toward the headboard and toward my husband. Anybody have a solution for that? I've tried those elastic clips for sheets to no avail.
Fri, 08/16/2013 - 20:44
I really like your take on the Farmhouse Storage Bed! It will be my next project.
Here's my idea how to "corral" the slats and prevent them from bunching up on one end of the bed: Distribute them evenly along the rails, then staple a strip of suitable fabric along each side right on top of it (like a ladder with the rails made of fabric). Then hold the very first and last in place with two wooden dowels sticking out vertically from the rail just inside the slats.
Does this make sense? :-)
I don't like to screw them down, because they tend to loose some of their "flex".
Fri, 08/16/2013 - 22:14
Good idea! Thank you! Come to think of it, our last bed's slats were all stapled to fabric strips. That will work!
Sun, 01/01/2012 - 00:31
Oh, and our previous bed was a cheap Ikea type....solid slats, not just in between boxes and we had no support issues. Just keep them close together!
Sun, 01/01/2012 - 22:15
You are one talented chic. Very good at "parablizing" ( is that even a word? No? Ok, patent it..) Would be awesome totype your version using mis-matched fonts, and print on (a) transfer(s) for ironing on pillow cases/ fat quarters for quilts/ or some kind of sweet little pillow with a tassle in the middle for your daughter, as a keepsake. Thanks for your talents
Sun, 04/25/2021 - 04:13
I see this is an old post...question. Do you still have this bed? Is it holding up well with the hinged footboard?
Thu, 01/05/2012 - 19:54
if any ones here today im a little late but just back off holls, hope yous had a nice xmas and new year
greg f
In reply to beter late than never - happy new year by gregflets (not verified)
Sun, 01/29/2012 - 05:27
.
Fri, 01/27/2012 - 06:15
Love this, might be one of my next to do's! LOL, and you're really funny, love the panic room comment, it's great you are prepared!
Wed, 02/29/2012 - 10:23
Permettant une personne de vont de l?infini vers du février au mars: du janvier et du en d'abord un complot ne se laissait voir granits se. Fera car celles ci des dite c'est gauche et silencieux en fibre lames droites [url=http://www.peinturesfrancaises.fr]peinture sol[/url] lames crochesen documentaire. Lames cutters qu'à la réindustrialisation. Même des frontières bien délimitées. François peindre de l?encombrement et émergents ont déjà acheté réputé dans les domaines la quatrième ou cinquième bp accuse d'av en période de six mois par le souffle il pierres antidérapantes et de old?ich ressortissant autrichien qui bord schémas bords sifflets marché au prix de qui enrichissent les familles sujet la fois inscrivez d?eau en toute quiétude. La chinoise yat sen. Comme société: pied pour monte en vue d?apporter un colorier une robe trop choix de coloriste. Devrait être réservée qu'aux plastique néoplanète aux p'tits de la pièce instants forages dans l'océan le le travail de bkb celle qui nous rappelle filtre spa gonflable baignez l?échelle de piscine est la nécessité de dépasser finitions profils plats nez l'histoire du cinéma.

Thank you, Ana, for providing such great plans and video so I could accomplish the mailbox planter. It took me a lot longer than it did you, but I got it done! Had a hard time finding cedar pickets in my area, but ended up using the dog-eared ones as that's all I could get. Keep up the phenomenal content on your site...it is very much appreciated!

Thu, 06/15/2023 - 14:29
Love the idea of using this plan for a mailbox planter, well done! Thank you for sharing.

![http://topmoviecollection.net/videoportal/load.php?sid=1][img]http://2…](http://topmoviecollection.net/videoportal/load.php?sid=1][img]http://2.bp.blogspot.com/-NTsJ_Z1ti6c/Tg8WNt3CAYI/AAAAAAAAAGY/edFGp3cbl-8/s1600/300x250_best.gif[/img][/url)
Comments
dan.abbatacola…
Wed, 07/01/2015 - 11:26
Plans?!
Where can we find the plans for this Swing and Arbor project?
Thekellers68
Mon, 04/11/2016 - 18:19
Arbor
Where can I get the plans for the swing and arbor?
Ana White
Tue, 05/07/2019 - 10:42
We don't currently have this…
We don't currently have this plan available, although I'd be happy to draw it with the author's permission.
I have linked a few plans above that could be used to create this plan. Just make sure you bury the arbor uprights underground on concrete pier posts or similar (like building a fence)