Community Brag Posts

Eric's Cedar Shed!!

Submitted by Anonymous (not verified) on Mon, 07/06/2020 - 21:35

Thank you for the plans, shed turned out great! My association required me to match the siding color, roof color, and anchor to a concrete slab. So I poured 25 bags of 80lbs concrete to make a 9x5 slab. Redid the plans for an 8x4 shed, built the frame with 2x4s and not 2x2's, installed flashing, ice/water shield + felt + matching shingles since I'm near Chicago, and used a flexio finishing sprayer to paint the shed. Saved some $ by using 2 Redwood Grain Fiber siding panels for $22 each at HD.

All in all very happy with my shed and all my dangerous yard tools and woodworking tools can be put away from my toddler.

Built from Plan(s)
Estimated Cost
400
Estimated Time Investment
Weekend Project (10-20 Hours)
Finish Used
Behr Premium Plus exterior paint
Recommended Skill Level
Intermediate

Swing and arbor

Weekend swing project

Recommended Skill Level
Beginner

Comments

Ana White

Tue, 05/07/2019 - 10:42

We don't currently have this plan available, although I'd be happy to draw it with the author's permission.

I have linked a few plans above that could be used to create this plan.  Just make sure you bury the arbor uprights underground on concrete pier posts or similar (like building a fence)

Fireman's Dog Bed

Submitted by FireWolf13 on Sat, 07/06/2013 - 12:06

I needed a heavy duty dog bed for my puppy after he destroyed two regular dog beds. I used 4x4s, 2x4s and fire hose. He has not been able to destroy this one and he loves it.

Recommended Skill Level
Beginner

Comments

SoCaliforniaMel

Mon, 07/08/2013 - 15:48

I have a pit bull. Shes the sweetest thing but loves to chew up her own beds. She wont chew the shihtzus bed or the cats beds just her own. I'd like to see her try this one out.
;) Now if I could figure out a way to get my dad to give up one of his fire hoses. hehe
Great job, great idea
~Melody

dr2112

Sun, 02/01/2015 - 10:41

How would I go about getting a copy of the plans for this?

Colorado Backyard Gable Greenhouse

Submitted by Anonymous (not verified) on Tue, 05/24/2022 - 20:17

We started this project last fall with the goal of creating a multi use hobby greenhouse with plenty of space for the kids to get their hands dirty. We purchased the Small Gable Roof Greenhouse plans and made our first (of many) trips to the hardware store. Since becoming homeowners in 2015, we've done countless projects but nothing as big as this. We are still very much learning the nuances of greenhouse growing in Colorado, but that has become a fun experience for our entire family. Since completing the structure, I've found that I'm more interested in making the space more functional than I am in actually gardening. I added a shelf built almost entirely from old pallets, a raised cedar bed and solar powered exhaust fan/lights. Luckily, my wife loves spending time in there tending to the plants! As the summer heat sets in, we will face new challenges of how to keep the space cool. Maybe by adding a shade cloth and misters? Regardless of what the "output" looks like we are loving this new hobby and are looking forward to learning new skills!

Comments

Farmhouse Media Cabinet (wall unit)

Submitted by bwblack2 on Wed, 01/15/2020 - 14:34

This project started as an idea to build a single Farmhouse Media Cabinet with a "42 tv mounted above it. I quickly realized that this space deserved so much more. Fast forward through weeks of debate and scouring the internet for inspiration, before finally settling on what you see pictured above. The first decision we made was to buy a monstrous 75", then everything else fell in to place from there. The tight stairwell leading to the basement forced me to build this unit in 6 sections (2 farmhouse media cabinets, 2 flanking cabinets, and 2 bookshelves.) It ended up sprawling 17' long when it was all said and done, but it fills the space so beautifully. It was by far the largest project I've ever tackled, but it was totally worth the hard work. Big shout out to Ana White for the inspiration!! 

Estimated Cost
$1200-$1500
Estimated Time Investment
Week Long Project (20 Hours or More)
Finish Used
Minwax(Early American), and Behr Premium Plus Ultra (Maui Mist)
Recommended Skill Level
Intermediate

Comments

Outdoor Sectional

Submitted by rachelmlee on Sun, 01/26/2020 - 20:23

This was my first real woodworking project and was so much fun! I use my deck much more now and am excited to build more!

Estimated Cost
$500 (with cushions)
Estimated Time Investment
Week Long Project (20 Hours or More)
Finish Used
Varathane Jacobean stain
Recommended Skill Level
Beginner

Playhouse

Submitted by Dawnybb on Thu, 11/22/2012 - 09:32

This was so much fun to do! Very easy and I added some personal touches. I made the lower level an enclosed sandbox area with a chalk board on the back wall. On the outside of the back wall, I added a "ball wall" that my kids love. I enclosed the bottom sandbox with plastic "chicken wire" to keep the cats out. :)

Estimated Cost
$500
Estimated Time Investment
Weekend Project (10-20 Hours)
Finish Used
Paint
Recommended Skill Level
Intermediate

Comments

Dawnybb

Thu, 11/22/2012 - 15:34

Thanks! Glad you like it!

The paint was from Dunn Edwards: Roof was "Louisiana Mud", playhouse walls were "Drifting" and then the white was a snow white from Lowe's.

The slide and accessories were also from Lowe's.

m7hennen

Tue, 04/15/2014 - 09:35

I LOVE this! This is exactly what I'd like to build. Do you have plans you can share with us? I think I'd also like to add a couple of swings on one of the sides too. Thanks so much!

In reply to by m7hennen

Dawnybb

Sun, 04/27/2014 - 08:39

I know I messed with the dimensions a bit but I don't remember exactly. I made the playhouse larger (deeper and taller than original plans) . I also cut the roof line on the deck side for more room. I put aluminum over the wood on the roof and then painted. The Ball Wall was made out of plastic gutter pieces that I painted and we used practice rubber golf balls to throw into them. I hope that helps! We sold that house, so I can't go out and measure it :)

eegad1973

Thu, 05/28/2020 - 15:32

You may not get this as this is an old post. Did you dig post holes? I have older kids and I am thinking about building a plan like this but at a 6ft height. Wondered how much it moves around when there are a bunch of kids on there. The house I will build is also 6 ft heigh.

Seasonal And Holiday

2x4 (and 2x6) Modern Adirondack Chair

Submitted by HR Dad on Mon, 12/28/2020 - 15:43

Been wanting to make some Adirondack chairs for years; have about 10 different plans saved that one day I could get to. These 2x4 modern plans made getting them done quickly possible due to simplicity of the cut list and cheap cost of materials. The only real change I made was to use 2x6 for the arms; I cut a taper along outside edge and increased the length of the arms by about an inch and a half to overhang the front legs a bit. Since I just used basic framing lumber, I milled all of the boards first with table saw and planer to make square consistent edges. And, I chose to use pocket screws in as many joints as I could so I wouldn't have screw holes on any visible faces. Add in a lucky find at the big box store paint return; scored this blue exterior paint for $2.00 a quart, and my weekend project turned out pretty good. Now I've got two neighbors that want 'em.

Estimated Time Investment
Weekend Project (10-20 Hours)
Finish Used
1 qrt Glidden Exterior Semi-Gloss; got it so cheap, I used the whole quart. Multiple coats.
Recommended Skill Level
Beginner

Porch Swing Glider

Submitted by Anonymous (not verified) on Fri, 05/19/2017 - 09:25

Built the porch swing and was inspired to build the glider frame by another "Brag Post" Looks great and fits perfectly in my back yard!

Built from Plan(s)
Estimated Cost
$200
Estimated Time Investment
Weekend Project (10-20 Hours)
Finish Used
Transparent deck sealant for frame, white exterior paint for seat panels
Recommended Skill Level
Beginner

Comments

Rachael Brown

Fri, 02/18/2022 - 08:20

Are there any dimensions for the glider part? I have first year agriculture students building this, but we are unsure of the cut list for this. I am sure I can figure it out as the teacher, but with 20 students in the class, it would be better to be able to give them instructions to follow on paper. Thank you!!!

The Greenhouse Gets a Custom Door Window!

Submitted by Anonymous (not verified) on Sun, 09/05/2021 - 06:00

I knew I wanted an unusual window in our new greenhouse door. It took a lot of looking, but finally found what I was looking for!

Built from Plan(s)

Comments

Wife's Kindergarten Classroom

Been a while since I had time to actually build anything worth posting about! My wife wanted some items for her Kindergarten classroom this year, so built several items, most inspired by the Farmhouse family.

Estimated Time Investment
Day Project (6-9 Hours)
Recommended Skill Level
Beginner

Comments

sido17

Thu, 07/18/2019 - 15:27

I would love the dimensions or plans for this. Would love to make it for my classroom.

dlee69

Tue, 07/30/2019 - 12:07

Hello

Can I please get the plans to the u shape table?

Thanks

Linguine

Mon, 08/19/2019 - 12:09

I am guessing the corner posts are 2 x 4s, the top is 2 x 10s.  It looks like the width is 6’ (looking at the floor carpet tiles being 24” square). So 2 - 2 x 10s side by side for the main part of the desk top and 2 - 2 x10s perpendicular on each side of the chair.  I guess the height is subject to choice and the length of each side would also be subject to choice or to the length of the 2 x 10s to be economical.


an educated guess would be 4 - 8’  2x10s for the top and 6 - 6’ 2 x 4s for the legs?  


Anyone else have any input here?  Open to suggestions.....

Pool Noodle Holder from DIY Planter Box

Submitted by Anonymous (not verified) on Sat, 06/04/2022 - 06:58

I modified the plans for the planter box to make a holder for Pool Noodles. I made it 40" tall and used 4-4" fence pickets and 1-5.5" fence pickets. I used a 4" spacer and the openings worked out perfect. I stained inside and out since it would show with 2 coats of the solid stain. It is perfect! Thank you so much for the inspiration and plans!

Comments

Dog Kennel

Submitted by Tamila on Wed, 03/16/2011 - 22:57

I am so excited to post these pictures of the dog crate I built for my boxer. I was a little nervous about beginning this project. It was my first project - aside from the garden boxes. I bit the bullet and bought the Kreg Jig, and I'm glad I did! It is so easy to use. The project was easy enough, I did make a few mistakes along the way, but I was able to fix them easily enough. The pictures show the dog crate without the door, (we were getting our puppy used to the crate before putting the door on). As you can see, the kennel is big enough for a big dog, my niece and my nephew had fun playing in the kennel.

Estimated Cost
$80
Estimated Time Investment
Weekend Project (10-20 Hours)
Finish Used
none yet ;)
Recommended Skill Level
Starter Project

Drop-Down Door Hutch Desk

Submitted by danicarby on Thu, 05/14/2015 - 13:47

I designed this desk from another desk I built. With this one, I wanted the overall foot-print smaller but still something that was able to organize all our office stuff and be able to close everything to keep it clutter-free. We have a small apartment, and although this desk is about the size of an up-right piano, it works perfectly into our living space!

I made it out of raw hardwood (Ash) and because I knew just the wood alone would make this desk heavy/bulky to move I made the top hutch removable. It's held in place by wood pegs (dominos). All the shelves are adjustable and the drawers are full-extension (something I've never had - wahoo)! The drop-down door is help up by 2 pull-out boards on each side (my first desk had chains). I spend a lot of money on this desk because I knew it was a chance in a lifetime to make and wanted it to be perfect and something that would last generations.

I built the main carcass off of plans/measurements I designed, but then all the insides, drawers, shelves, doors, etc where made as I built (because just a millimeter difference in building changes everything)!

If you want more pictures/descriptions of the building process I wrote about it in a 4-part series on my blog.

Estimated Cost
$1,000 for all wood & supplies
Estimated Time Investment
Week Long Project (20 Hours or More)
Finish Used
To achieve the ash gray color I used "General Finishes" brand water-based stains (equal mixtures of Walnut, Antique Oak & Whitewash) with 1/2 ratio of Pre-Stain Conditioner (bought from Woodcraft). I did 2-3 coats stain, lightly sanded and sprayed 2 coats of Ceramithane clearcoat using HVLP sprayer (sanding with 550 grit paper in between).
Recommended Skill Level
Intermediate

Comments

Patio Stools 35 inches

Submitted by Kcirone on Sun, 08/09/2015 - 17:10

I adjusted from the plan to build the stools to 35 inches and found they remianed very stable! Used Cedar for the seat and aprons, and redwood for the legs and supports. 

Built from Plan(s)
Estimated Cost
25 per stool
Estimated Time Investment
Day Project (6-9 Hours)
Finish Used
Jacobean stain
Recommended Skill Level
Beginner

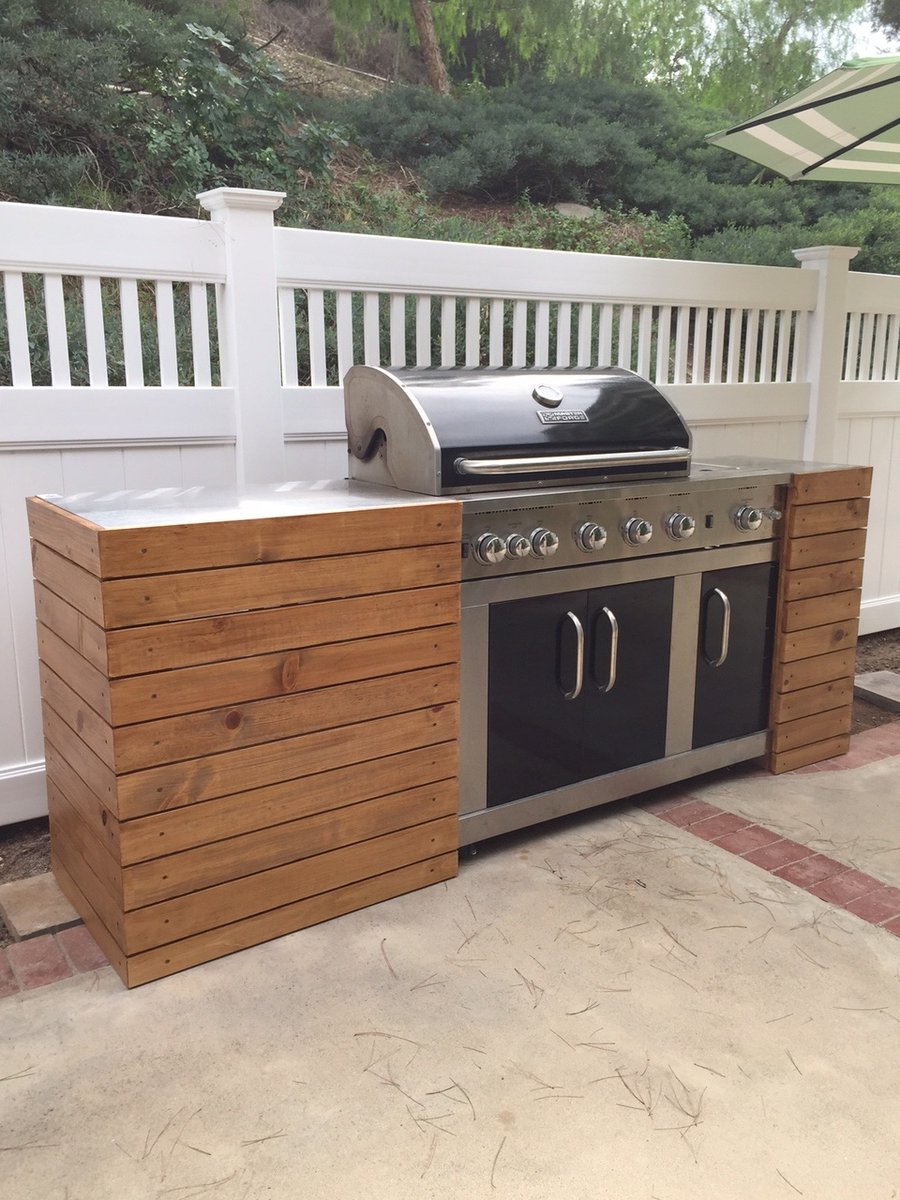
Barbecue/BBQ Quick Built-in

This was just a standard BBQ with an attached folding table. I used a combo of Ana's plans to add a little character and style to the BBQ and it made a huge difference in not only the BBQ, but also the backyard. 

Estimated Time Investment
Weekend Project (10-20 Hours)
Finish Used
Golden Oak
Recommended Skill Level
Beginner

Comments

mdwstgrl

Mon, 05/23/2016 - 12:29

Hello:  Very interested in which plans you used to build the BBQ Built In. Thank you.

Cornhole Boards

Submitted by SaraLodise on Fri, 09/23/2016 - 13:15

Cornhole boards for friends and family :)       Used 1x4s for framing and legs, 1/2" ply for top.


"R" set:  Birch plywood tops w/ (2) coats of Miniwax Weathered Oak oil stain. Red stripe is Behr 'Cherry Cola.'  (3) coats of Polycrylic finish.


"AW" set:  Regular plywood tops w/ (1) coat of Miniwax Special Walnut oil stain & Glidden 'Clemson Orange' stripe.   (3) coats of Polycrylic finish.

Estimated Cost
$100/set (2 boards)
Estimated Time Investment
Weekend Project (10-20 Hours)
Finish Used
(see description)
Recommended Skill Level
Intermediate

Comments

Seasonal And Holiday

Poolside Towel Cabinet from Benchmark Cabinet Plan

Submitted by Anonymous (not verified) on Thu, 03/23/2017 - 11:21

My father and I made this awesome poolside towel cabinet using the Benchmark Cabinet plans. A super easy 1 day build and it looks amazing on the patio. Bring on the pool weather! 

Estimated Cost
$60
Estimated Time Investment
Day Project (6-9 Hours)
Finish Used
Chalk paint/Poly topcoat
Recommended Skill Level
Beginner

Bathroom corner vanity

Submitted by Anonymous (not verified) on Mon, 06/12/2017 - 12:49

This project started because a corner bathroom vanity that fit my space requirements and budget did not exist. A plan specific to what I exactly needed also did not exist. After combing through what plans I found online, the Wall Kitchen Corner Cabinet best matched what I wanted. I modified it with the Momplex Sink Base Kitchen Cabinet in order to turn it into a sink base.


But, there was a problem. I hadn't actually built anything before. In order to get at least one project under my belt, I built the Vintage Step Stool. It turned out great, so I figured I was ready to go! Strangely enough, after spending about $100 and several weekends picking away at this project, it was done! It looked great, even. Then, I moved the vanity into the bathroom and realized that, while it may have looked great, it wasn't very square. Lesson learned was that this is a two person project. It is too difficult to keep things square and screw at the same time when there is only one person.


At this point, everyone was tired of having to use the kitchen sink to brush their teeth and wash their hands, so we needed to get this project done. $100 later, we had more material. Since I had figured out what needed to be done with the first vanity, let's call it our prototype, the second vanity went together REALLY quickly. 


Within a few hours, it was pieced together. Since it was going to be painted, we used Bondo to cover up our imperfections. Yes, of course there were imperfections. While much better than the prototype, it still was only my third woodworking project. Sanding, caulking, and priming took another hour or so. A few coats of the finish paint went on, followed by a couple more coats of a clear sealer, and it was done.


We moved it into place, screwed it to the wall, put the soapstone countertop on along with the sink and faucet, and it truly was complete. Sink is Kohler, faucet came from our local Habitat for Humanity store and I'm not sure what brand it is, and the soapstone came from soapstones.com. If we had oiled the soapstone with mineral oil, it would be a very dark gray.

Estimated Cost
$100-$150 for the wood, screws, caulk, primer, paint, and clearcoat.
Estimated Time Investment
Weekend Project (10-20 Hours)
Finish Used
Pratt & Lambert Azalea 5-12 and Designer White 33-1 for the colors. After each application dried, I sanded it with a very fine grit sandpaper to make the finish silky smooth. I also used our air compressor to blow the dust off, and then used a damp cloth to wipe it down before applying more coats. That worked better for me than using a tack cloth. Then, I added a few coats of a water based, heavy duty floor finish, meant for wet areas. I don't recall what brand it was.
Recommended Skill Level
Intermediate

Headboard based on PB Oxford Storage Bed

Although I didn't build this from a plan I wanted to be sure and share it as it is because of my experience building from Ana's plans that I felt comfortable giving this a shot.

My in-laws were just updated their lake cabin and wanted a storage headboard as space is a premium and it will be the only furniture in the guest rooms. It is unique as it has shelves on either side which can pull out to function as a small night stand, perfect for cell phones, books etc. The back of the piece is tongue and groove knotty pine which for the more rustic look they wanted.

I will probably do things a little different when I build the next headboard but overall I am satisfied with the end result. I chose not to do a lower storage area, mainly to keep the cost down. It could be done very easily but this piece is already very heavy and that there is plenty of storage.

Estimated Time Investment
Weekend Project (10-20 Hours)
Finish Used
Special Walnut stain with semi-gloss Polycrylic. All of the wood was sanded and then I applied wood conditioner. One coat of the stain and three coats of the semi-gloss. I live in Minnesota and build it in my garage so I had to wait until this week when temperatures finally were warm enough to apply the finish.
Recommended Skill Level
Beginner

Comments